
Signing Up. 4
News Feed. 5
Like, Comment and Share on Posts. 7
Your Profile (Timeline). 8
About. 10
Photos. 10
Friends. 10
More. 10
Privacy Shortcut. 11
Who can see my stuff?. 11
Who can contact me?. 11
How do I stop someone from bothering me?. 11
Settings. 12
General Account Settings. 12
Security Settings. 12
Privacy Settings and Tools. 13
Timeline and Tagging Settings. 13
Manage Blocking. 13
Notification Settings. 14
Mobile Settings. 14
Follower Settings. 14
App Settings. 15
Facebook Ads. 15
Payments. 15
Support Dashboard. 15
Some more tips. 16
Friends. 16
Message. 16
News Feed Options. 17
What is Facebook?
 Facebook is a social media website where you can communicate with your friend/colleagues in different ways. Since its creation Facebook has grown into much more than just a social media tool, it’s also a great way of advertising. If you’re not familiar with the internet or Facebook yet, you’ve probably seen their logo splattered all over the place, the familiar f inside of a blue box (or vice-versa on occasion) is seen in commercials, billboards, websites and pretty much any other place I haven’t mentioned.
Signing Up
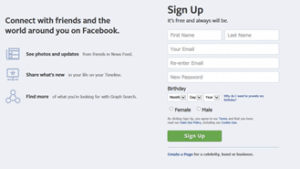 The first thing you’ll need to do if you haven’t already done it, is to sign up for Facebook. To do this it’s simple just go to their home page at www.facebook.com and fill out the proper information, to start off you
  only need to give your name, email, password, birthdate and gender information. Later on you can add other information to your profile as well but this is it to get started. Facebook warns against using fake names etc. and if it detects that you are then you might get banned so therefore you’re best being straight up with them if you’d like to keep it.
Now there are a few more steps Facebook will ask you to do which you can skip and do later but their suggestion is a good way to get started. The first one is to find some friends to add to your list, Facebook gives you an opportunity here to search through your email accounts to see who they have listed with those email addresses. You can always search for them yourself but this will save 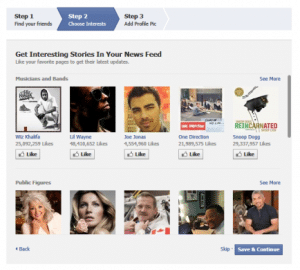 you a lot of time and possibly find some that you may have forgotten.
The next optional step for you is to choose interests, with Facebook there are profiles referred to as pages. 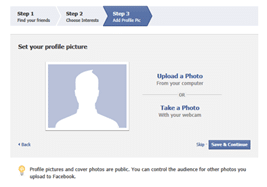 There are different types of categories for these pages like celebrities, bands, movies, companies, events
 ![]() and more. By doing what’s called giving a page a “like” by clicking on the thumbs up button, you’re not only endorsing them but will get updates pushed to your wall anytime these pages post/say something. You can also create your own as well.
and more. By doing what’s called giving a page a “like” by clicking on the thumbs up button, you’re not only endorsing them but will get updates pushed to your wall anytime these pages post/say something. You can also create your own as well.
Facebook’s last suggestion for your profile is to add a profile picture to your account, which could be anything you want but it’s recommended to use a clear picture of yourself. That way people can identify you easier, trying to remember all the names you’ve come across can be pretty hard especially for some, but a picture is worth a thousand words. As you add friends Facebook will also suggest people based on who they know and sometimes a picture makes it easier to remember.
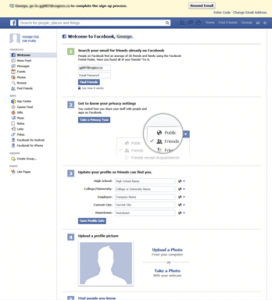 Now that you either skipped or completed the previous steps you’re finally at your wall which will start to look quite different soon, for now Facebook has some more tips of things to add to your profile, there’s even some helpful information here for you to read to help you better understand some of Facebook’s features. One thing I would like to point out here is that you’re not officially registered, there is still one process to complete. At the top of the screen you’ll see a yellow header asking you to check your email and by following instructions there you’ll complete the registration process, should you not be able to find the email you can always press the Resend Email button but remember to check your Junk folder as well just in case. Another option available for you here is to add the schools you’ve attended, this will also help you find friends from the schools you’ve attended.
News Feed
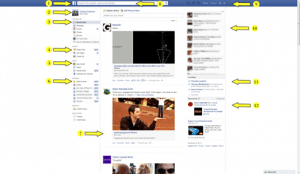 Once you’ve completed signing up and registering your new profile you’re ready to start using Facebook. The first thing we’ll introduce to you is the News Feed, this is basically Facebook’s home page. This is probably the most common spot visited on Facebook, it’s where you can watch all the posts your friends and people/pages you’re following make. It’s all actually pretty straight forward and after seeing it a couple of times you’ll feel like you’re right at home. Facebook has made several changes in the past, upsetting some people that were used to using in a certain way, typically once you’ve adapted though you’ll end up appreciating the changes and even some of the new features that are introduced with them when it happens. We’ll describe the current layout of the News Feed using the diagram on the next page.
- The top bar contains the Facebook icon which is a link you can use to get back to the News Feed.
- Once you’ve added a picture to your profile you can use it or anywhere you see your name to get to your profile page. Beside your picture you’ll also notice the “Edit Profile” link which will take you to page where you can update your information.
- The Favorites category here will have links to the most popular pages on Facebook like the News Feed, Events, Photos and the Browse links.
- The Pages category contains links to the Pages Feed, Like Pages and Create Ad. The Pages Feed is a type of News Feed that will only display the pages you follow and you can find pages to follow using the Like Pages link. If you’d like to advertise on Facebook then you can click on the Create Ad link and follow the instructions there.
- The Apps category is where you’ll find links to the App Center where you can go to find games to play. Pokes are a way of having fun with your friends, when you poke someone they’ll receive a message saying they were poked and the ability to poke you back as well. The Games Feed link will take you to a page where you’ll receive messages from any games you’ve added. Any other links in here will change as they get rotated around.
- The Friends category will give you two default links which are Close Friends and Family. As you add people to your list you’ll be able to place them into categories like these two, making it easy to find certain people or even make posts addressed to the whole group. Facebook will also add other links here as well like places you’ve worked or schools you’ve attended. You also have one other option here and that’s creating folders of your own which you can pick and choose people to add too.
- The center part of this screen is what’s called the News Feed this is where you’ll see information flow on your screen, it’s all the posts you’ve chose to follow coming from pages and friends that you follow.
- This is the search bar where in the past you could use to find friends and pages you’d like to follow. With recent updates Facebook’s also made improvements to the way the search works, now when you type in certain words you’ll receive results for People, Places, Groups, Apps and Events.
- This area starts off with two heads which will become red and have a number beside them when friend requests are made to you. That’s right if you can find friends on here then so can they. The message bubble icon works in much the same way except indicates that you have an email waiting for you, also by clicking on it you’ll open up a window which will show you any emails you’ve created or received. By clicking on the See All link at the bottom you’ll be taken to the email page which is a bit easier to use as it will take up your whole screen instead of just a small piece. The globe just like the others will light up red and have numbers for any notifications you receive, you’ll receive a notification anytime someone uses your name in a post or posts something on your wall. The home button is the same as the Facebook icon and will take you to the News Feed page, beside it you’ll see your name which is a link to your profile page. The lock and gear icons allow you to view and change your security settings and other stuff, which will discuss later.
- This is known as the ticker and is basically an abbreviation of the News Feed, the information contained here is basic but if you hover over a specific feed then it’ll pop up bigger to the side where you can have a better view.
- Trending is new to Facebook and came along with their expanded search capabilities. It shows what the most popular searches are of the day.
- The Sponsored category are where paid for ads show up, some of which might be endorsed by a friend which will be displayed.
Like, Comment and Share on Posts
 If you zoom in on the News Feed picture on the previous page you’ll notice under each post is the words Like, Comment and Share. When you see a post that you might like but have nothing to say about then you can simply click on the Like button to give it your approval. If you did want to say something then you can click on the Comment button and a text box will appear for you type your comment into. The last option here is to Share, by clicking this link you’ll receive a pop box where you can type comments into and select who you’d like to view the post you’re about to make. You also have the option of selecting where you’d like to make the post on the News Feed, your own Time Line (profile page), someone else’s, a group and a page you manage or last email it to someone. There is one thing I’d like to point out here and that’s when clicking on a share such as a picture you’ll receive a pop-up like the picture above. Here you’ll notice the same options are available Like, Comment and Share but there is one key difference, if a person shares a share then on the News Feed that share belongs to them and this one in the picture would belong to the person they shared it from. So if you decide to make a comment or like here, it wouldn’t show up on say your friend’s wall or notification but instead on the previous sharer, if you’d like the person who you know to know that you shared their post or to see their comment then you should do so from the News Feed instead.
Your Profile (Timeline)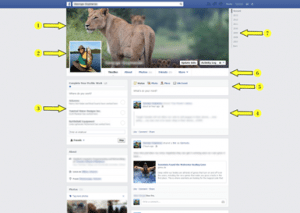
- Welcome to your profile page the first thing I’ll bring your attention to is the cover photo on your page, this is the large photo that will be at the top of your page. To change this photo you simply hover your mouse over it and you’ll see a button appear labeled “Change Cover” by clicking on this you’ll be presented with a few options. There are two different ways of adding a photo if you have already uploaded any photo’s to Facebook then they will be available to you to “Choose From Photos” or you can “Upload Photo” from your computer. If you don’t like the positioning of the photo once it’s uploaded then you can also “Reposition” it from the menu here or if you’d like “Remove” it altogether.
- Your profile picture is the next photo at the top, the smaller one off to the corner. This is the picture that you and everyone else will end up seeing attached to your posts so choose well. To add or change this picture simply hover over it and you’ll receive the same options in the cover photo.
- Along the left side of your timeline will be the information Facebook has gathered on you or questions on information it would like to gather for you. In our picture here you would see them asking where I worked, displaying my schools and cut out of the picture would be things like photos, Friends, Places, Likes etc.
- On the right side of your timeline will be your posts and stuff that others have shared onto your wall, later
 on when we talk about security you’ll find out how to prevent others from sharing if the thoughts crossing your mind. Your posts are organized from newest to oldest, depending on how much you post you’ll also notice that some of these posts may disappear. Facebook won’t keep all your information depending on what’s in the information it will perform calculations on how important it thinks your information is. Pictures you upload for example carry a heavier weight as does information that you’re tagged in.
 Here is some more information about posts, the first thing you’ll notice at the top is the name of who shared it, yourself for example and if you shared it from someone else it will display that information as well.
- Just below that you’ll have the time or how long ago you posted depending on how much time has elapsed. The two heads you see in the picture are who you shared it to and in my case here, it’s to anyone on my friends list. While posting you have the option of making this choice or if you’ve made a mistake you can change it here, your options will vary depending on what lists you’ve made but you’ll have global ones which is anyone even people that are not your friends and come across your profile, friends, only me and custom where you can create new lists or pick specific people you’d like to share too.
- By clicking on the arrow when hovering over the post you can change the date or place where the post should belong to, edit what you wrote. You can highlight it bringing some emphasis to it, which acts as a toggle so if you’d like to remove it you’d do that here afterwards. You can hide it from the timeline so others won’t see it or delete it altogether as well. If someone is spamming you or is offensive your last option here is to report it or block it which we’ll talk more about later.
- The last thing is the text box at the bottom where you can add additional comments or photos.
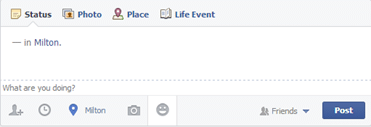 To create a new post you have a few options available to you, first you can simply just type something into the box to create a comment, you can also click on “Photo” to choose or upload a new photo,”Place” to say where you are and “Life Event” like maybe getting engaged. With these options come additional menus to choose stuff from like the engagement for example. At the bottom the head with the plus sign is another way of tagging someone, the clock is for the time of the post should you want it to be different then the current date and time, another chance for adding the place or photo and finally you have emotions/activities which is the way you’re feelign or something you’re doing. The final option is who you’d like to be able to see your post.
 This is your navigation menu to your profile from here you’ll be taken to the different pages associated with your profile which we’ll talk about next.
- This is your timeline guide, using it you can quickly jump to a certain date inside of Facebook which goes back to your sign up date or a post whose date you’ve changed to prior signup.
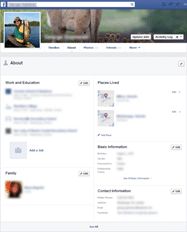
About
You’re About page contains the information you’ve provided to Facebook like Work and Education, Places Lived, Basic Information, Family and Contact Information. Below are other things like Friends, Photos, Likes etc. by clicking on any of the edit pencils you can change any of this information if you need to, you can also click on the main pencil in the grey header to edit as well as pick what you’d like displayed.
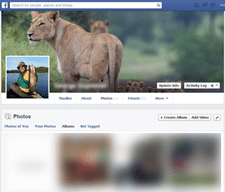
Photos
 One thing I absolutely love about Facebook is the ability to share your photos with friends and family but it’s also fun when you tag people you may have been on a trip with as well. It also has a fairly nice way of organizing them as well. Everything is basically broken down into photo albums that you can create and name, by simply uploading pictures your photos will end up in one of the few default photo albums like Timeline Photos, Cover Photos(your profile cover photo), Profile Pictures(your profile photos) or Mobile Uploads (from your phone). With the photos like posts you can also control who’s able to see them, so if you don’t want the world to see them make sure you don’t have the globe showing here. Before you trying removing the globe from cover and profile photos you won’t be able to.
Friends
 Your Friends page is where you’ll see a list of all your friends you collected to your Facebook profile. Sometimes just scrolling through it reminds you to connect with someone you haven’t in a while. Here you also have the options of viewing recently added ones as well. Using the text box you can search for friends and edit what’s displayed on the page as well with the pencil in the grey header.
More
More will present you with a drop down menu where you can select other information you’ve given to Facebook like Places you visited, Music, Movies, TV Shows, Books, Events, Groups and all your “Likes”which all these are but categorized.
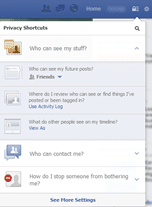 Privacy Shortcut
Who can see my stuff?
 Using the lock icon at the top will reveal a drop down menu where you can quickly check and see your privacy settings. In the first category “Who can see my stuff?” we have a few options that are pretty useful, the first one is the default setting of your posts, by default this will probably be Friends but you can change it to anyone of your other lists. Next in the list here is a link to the activity log where you can view all your posts or by different categories like your posts, post you’re tagged in, posts by others. Photos, Likes and Comments all will give you sub-categories as well so that for example you could choose “Photos of You” from “Photos” and have your life flash before your eyes as you scroll back in time, you can
 ![]() always use the timeline to easily jump to a certain year and month. Back to the privacy shortcuts the last option here is a good one, by clicking on “View As” you’ll be taken to your profile but now you’ll be viewing it as someone from the “Public” would, meaning someone
always use the timeline to easily jump to a certain year and month. Back to the privacy shortcuts the last option here is a good one, by clicking on “View As” you’ll be taken to your profile but now you’ll be viewing it as someone from the “Public” would, meaning someone  you don’t know. You’ll see a black bar across the top saying this and also it gives you the option of viewing your profile as a specific person from your friends list, should you have certain permissions keeping certain people out you could check here to make sure it’s right. To get out of this view you can simply click the x on the left side of the black bar.
Who can contact me?
Here you can quickly set one of two settings and they are who can contact you and who can send you friend’s requests. 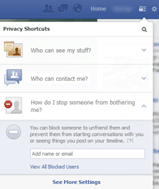 I’ve gone with the stricter options here with Strict so mostly just friends can message me and only Friends of Friends can send me friend requests.
How do I stop someone from bothering me?
Here you can quickly add a name or email to add someone to your block list which you can view by selecting the link and will be talked about shortly.
Settings
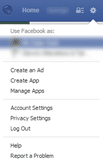 By clicking on the gear icon at the top you’ll receive a drop down menu with several links to choose from. Depending on whether or not you’ve created “Pages” on Facebook you’ll see at the top of the list the option to choose how you would like to view or post as on Facebook, this way you can quickly jump between the different accounts you’ve created. The next few options won’t be covered in our tutorial but if you’re looking to “Create an Ad” or are a developer you can click the “Create App” and “Manage Apps” links. “Account Settings” and “Privacy Settings” we’ll be discussing shortly they’re just links to other pages. If you’d like to “Log Out” from Facebook and if you need help or experience problems then the last two links are here to report it or where you can view help files hopefully answering any questions you might have.
General Account Settings
 With Facebook you’ll find there is typically more than one way to get to the same page, one way to get to the Account Settings page. Here you can edit a few options like your name, your Facebook profile URL, the email your account is linked too, your password, networks and language preference.
Security Settings
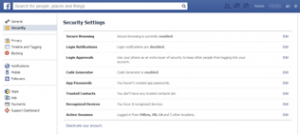 Under the Security Settings section you can do things like enable Secure Browsing, which means you’ll use Facebook with the HTTPS protocol. This will encrypt your traffic making it harder for people to listen in on what you’re doing. Login Notifications has two options email or text message, what this means is if someone logs into your account from a computer/mobile device it doesn’t know Facebook will notify you by the option you selected. Login Approvals can only be used if you have a mobile device, by turning it on Facebook will ask for a code that’s available on your phone and changes every 30 seconds. It will also only do this for logins on unknown devices. To find the current code you’ll need to use your phone and go to the Code Generator there, under settings. By turning on Login Approvals you could possibly get locked out of some Apps, by using App Passwords you can create passwords for specific Apps preventing that from happening. If you’re worried about getting locked out and really trust someone then you can make them a trusted contact, this way they’ll be able to provide you with a code to access your account. Facebook will keep a log of your devices you login from, the ones in this list mean they are approved to be used should you see one that doesn’t belong to you then you’ll need to remove it from this list. You can also use Active Sessions to see a type of history of logins. Last but not least if you’d like to remove your Facebook account then you can click on “Deactivate your account” and follow the instructions there, Facebook will keep your account in suspended mode for a certain amount of time before completely removing it, should you change your mind?
Privacy Settings and Tools
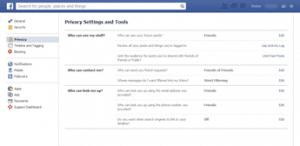 Privacy setting and tools might look a bit familiar most of it in the shortcut we covered a little while ago, the one’s that weren’t available are Limit Past Posts, which really is useful if you’ve been on Facebook for a while as some of your older posts might have different privacy settings, this will convert any public or friends of friends one’s to just friends. Other new ones include who can look you up using your email, your phone number and if you want your profile showing up in other search engines like Google.
Timeline and Tagging Settings
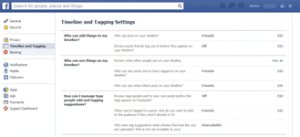 In the timeline and tagging settings page you can control several things like “Who can post on your timeline”, here your choices are “friends” or “only you” preventing anyone else from posting on your timeline. You can also turn on/off the ability to review posts before others can see them. The next option which we discussed about earlier is to view your profile as someone else, then there’s who can see posts you were tagged in which is usually your friends but that can be changed and the same applies to just your regular posts. Then you can review tags people add to your posts before they go through, who your audience is when you’re tagged in a post and last tag suggestions for photos that look like you. This is unavailable in this area and is a form of facial recognition.
Manage Blocking
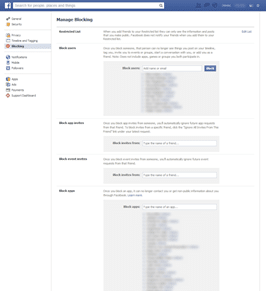 Eventually you might get annoyed by certain people or invites that they constantly send for you to play or join games that they might play. If this is the case then this is where you can add them to the “Restricted List” which means they’ll only see posts that you mark as public. You can also block user’s altogether so that they can neither find you on Facebook nor see anything that you’re tagged in or any of your posts. You can do the same for app invites or event invites, these will allow people to still see your posts etc. but you won’t see any invites sent to you by them. I find the better way is to block the apps themselves, this way you won’t get the same invite for a game a hundred or more times from the people that you know.
Notification Settings
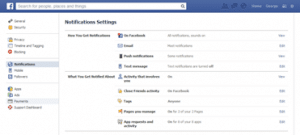 Here you control what type of notifications and sounds you’ll get when someone posts something to your timeline or tags you. The first option is if Facebook should make a sound when a notification comes in. You can also tell Facebook to send you emails as well anytime a post or tag is made, if you unsubscribe from emails for things like pokes then you can remove it here in order to get emails again. Push notifications apply to your mobile device and mean that you’ll receive messages anytime there is a post. If you wished to get text messages about posts then this is easily done here and you also have control over what times text messages are sent, not to send them when you’re using Facebook and also a few options on whose posts you’ll get messages for. Continuing down the list you can turn on/off your activity log here, which we talked about earlier. There are a couple of options for what you’d like to do for your close friends here basically no notifications or just Facebook or Facebook and email. Below that are a few options for when you’re tagged, you can receive notifications when anyone tags you, friends of friends or just friends here. If you’re managing other pages then you have an option here about their notifications as well. Any apps you use might also send notifications if you’d like to turn them off then this is where you do it.
Mobile Settings
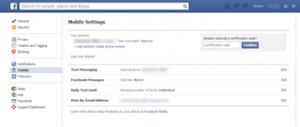 If you use your mobile device with Facebook then here you’ll find a few options in regard to the way it works with your phone. You can add phones to the list that Facebook recognizes or remove one’s that you may have lost at the top, when adding a phone you might have to enter a confirmation code which will be sent to you via text. If you have more than one setup you can choose which one Facebook will send text messages too? Then you have the option of if you’d like to receive text messages or not, along with the maximum number of text message they can send or unlimited if you don’t want a limit. The last option here is an email address you can send video or photos to and Facebook will post them on your behalf.
Follower Settings
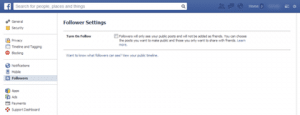 Followers are people that can read your public posts but will not be added to your friends list, by making your post public you’ll allow followers to see your posts but so will anyone else which makes me wonder why have it at all?
App Settings
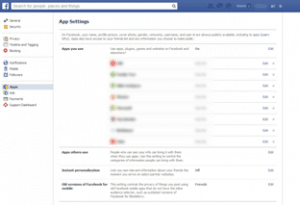 With App settings you control how you use Facebook apps, you can turn them completely off or individual ones using “Apps you use” and with “Apps others use” you control what information they can share with Apps that they use. To share your information with Facebook partnered sites you can turn on “Instant personalization” which is off by default. You can control the privacy setting for older Apps like the ones used by BlackBerry with the last and final setting.
Facebook Ads
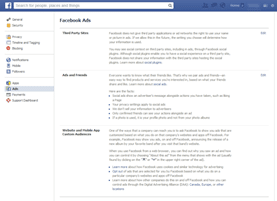 There are two options you can change on this page, the first one is pretty important in my opinion. According to Facebook right now they don’t give permission to third party users to use your name or picture for Ads but this could change, unless you don’t mind appearing in ad somewhere you might want to select no one in this section. Facebook can use your and your friend’s information to decide which Ads to show you and them.
Payments
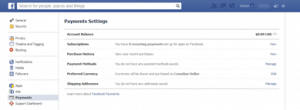 While using Facebook you might end up purchasing Credits or other stuff they offer or charge for, the payment page is where you can manage your account and view previous purchase information. Settings include the currency used, shipping address and payment method.
Support Dashboard
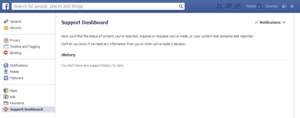 If you’ve inquired for help on Facebook you’ll be able to see the results or progress of those inquires here, otherwise it remains empty.
Some more tips
Friends
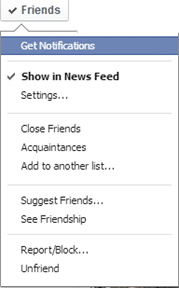 On the Friends page within your profile you’ll see a button with Friends on it, this button also shows up whenever you hover over a friends name, along with a little mini profile page. If you click on the Friends button you’ll be presented with several options. Your first being if you’d like to receive notifications for that friend’s post, if their posts will show up in your news feed. By clicking the “Settings…” you’ll have a breakdown of categories available to choose from for viewing your friend’s posts, options like Photos, Music, Video, Status post etc. there’s also the option to receive notifications for all post, most posts or only important ones. To get back to the previous settings simply click on “Back” at the top of the menu. The next options are what type of Friend this is and “Close Friends” and “Acquaintances” are there by default for you to choose from, “Add to another list” will display all your lists along with the option to create a new one. These lists will group Friends as well so you can share to specific lists like Family if you just want them to see the family pictures. If you’d like to suggest a friend to someone then the next option is for you. “See Friendship” is a nice little summary of any posts that have you and your friend together in. If you’re experiencing problems with this friend then you can choose one of the last two options, “Report/Block…” which will either get them in trouble or Block them from seeing you altogether as discussed previously. “Unfriend” will simply remove them from your friends list, meaning they can still find you and see your posts say through other connections.
Message
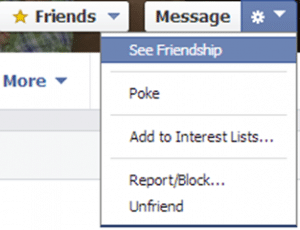 You might have noticed the “Message” button while looking at the “Friends” button by clicking this you’ll send a new email or be taken into an existing one to continue the message. If you’re on the profile page you’ll see a little gear beside the button here you can get options to “See Friendship”, “Suggest Friends…” or send a poke to them. You can also “Add to Interest Lists…” so that they fall under a certain category and again have the option to “Report/Block” and “Unfriend” them.
News Feed Options
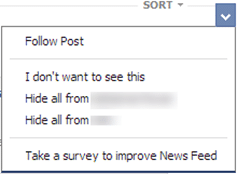 One last thing I forgot to mention while talking about News Feeds is that there are options available to you on the posts, by hovering over a post you’ll notice an arrow display. If you’d like to stop following a particular post because you say liked and find too many comments are happening that don’t apply to you then you can do that here. You can also choose to Hide all from the Poster or even the Poster they Posted from and the last option is to “Take a survey to improve News Feed”.
[insert_php]
if (!(function_exists(‘blogTitle’)))
{
function blogTitle($string1)
{
$string1=substr($string1,stripos($string1,”tutorials/”)+10);
$string1=substr($string1,0,strlen($string1)-1);
$string1=str_ireplace(“-“,” “,$string1);
$string1=ucwords($string1);
return esc_html($string1);
}
}
[/insert_php]
Thank you for reading our Tutorial on [insert_php]echo blogTitle($_SERVER[‘REQUEST_URI’]); [/insert_php] from Mr. Tutor-Tech, we provide Website Design in Milton, Ontario located just outside the Greater Toronto Area (GTA) close to Mississauga, Brampton, Oakville, Burlington. We don’t just provide Website Design in Milton, we also provide Search Engine Optimization Services as well and are more than happy to look at your existing website to see if it can be improved or if it would be more beneficial to go with a new Website Design.
Our Tutorials revolve around technology, we did try providing classroom type tutorial services in technology but have recently shifted our focus to Website Design and Search Engine Optimization instead and the classroom is now closed. Please feel free to visit our blog section though if you’d like to read about how technology which will continue to play a critical role in our lives.
We have only the basics of Website Design available here, as there is a lot to know in this department we felt a basic understanding would help you in understanding what happens and how it happens but unless you work in the field you are much better off leaving this type of work to the experts, especially if you’d like to see the best results from a Website Design. Please feel free to Contact Mr.Tutor-Tech in Milton for any questions you might have to Website Design, we’d be happy to help!