
Once you’ve registered with Google and started using Google Drive, you’ll be able to create new documents using any of their programs but we’ll be covering their word processing document app here. The first thing we’ll dive into is familiarizing ourselves with the different parts of the window.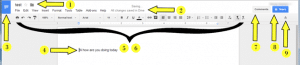
Documents Window
- Here you’ll see the name of your document which you can change by simply clicking on it, if you’d like to add a star to it so you can easily find it in the starred shortcut of Google Drive you can do this here along with clicking on the folder which will allow you to move the document to a different folder on your drive.
- Once you’ve started working with your document you’ll either see the text stating that all your changes have been saved or text telling you that it’s in the process of saving it.
- This is a shortcut to the Google Drive, should you have closed the tab that brought you to the documents app you can always click on this and a new tab will open to your Google Drive.
- This is body of your document where you compose or write what you would like to and will see it the way it would look like as if it was printed, known as WYSIWYG (What You See Is What You Get).
- Just above the ruler you have a number of tools available to you for formatting your document, like changing colour, fonts, etc.
- The ruler is just below the tool bar, this can assist in lining things up and keep things straight by using margins or tab-stops.
- When working with your document you might need to add comments that aren’t part of the document to help others that might be working on it with you know what might be going on or even simply reminding you of something that you’d like to do for example.
- This button will present you with a window with options on sharing by either giving you a link you can send to people or by letting you type in an email address and allowing Google to send emails for you.
- The arrows are a toggle button and will minimize the menu or expand it depending on what state it’s in after clicking it.
The Toolbar
We’ll look at the tools available on the tool bar from left to right:
- Print – Your first option here is to print your document, this will present you with a preview of your document along with other options on the left pane for what printer you’d like to use, what pages you’d like to print, the number of copies, color or black & white, margins and if you’d like it double sided along with if you’d like to include Background colors and images.
- The next two options are the left and right arrow which are your undo and redo options, if you made a mistake you can use the undo button to go back a step and the redo option to repeat the step you just undid. You can also the redo option to recreate the last step you just did as well.
- When applying formatting to your document like bold or colour, you might like to add the same type of formatting from one part of your document to other parts. You can use the Paint Format tool for this, by placing your cursor in the text whose formatting you’d like to copy and pressing the button you’ll then be able to drag your cursor over other text applying the same formatting to it. By clicking on the button once you’ll be able to copy over the formatting just once but by double clicking on it you’ll be able to continue to apply the formatting to any part of your document repeatedly, if you double clicked it then you’ll need to click it again to turn it off otherwise it will turn off on its own after you pasted the formatting with the one click option.
- Moving along your next option is the zoom at which you are viewing your document from here you can select Fit which will zoom in to the full width of your window or you can use any one of the percentages available.
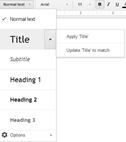 The next button is for applying styles to your document, a drop down menu will appear here and the button will be labeled by the last one you chose or Normal text by default. This is a very useful tool to keep your document uniformed by applying different titles and headings a certain style. You can also change these styles to whatever you’d like by formatting the text first and then with your cursor placed inside of that text click on the drop down arrow and hovering over the style you’d like to change you’ll have a right arrow present itself by clicking that you’ll now have the option of applying that selected style.
- The next dropdown list provides you with the option of changing fonts, there are several on the list to choose from but by selecting more fonts you’ll presented with many more options in a separate window.
- The font options continue with the size of the font you’d like to use followed by the ability to bold, italicize, underline and colour.
- Your next two options on the bar are to add a hyperlink to a website using the chain link image or to add comments to your document like you can with the Comments button.
- The next four buttons allow you to adjust the alignment of your document with your options being left, centered, right or justified. Just after that you can specify the line height should you want more or less space between the lines of text.
- You have several options with different types of bullets with the next two buttons and their dropdown lists, the first one is a numbered or ordered bullets where the next button will allow you to use unordered bullets like diamonds, circles etc.
- When working with your document you might want to increase or decrease indenting on particular lines or paragraphs these next two buttons will do just that for you.
- The Tx button just after indents is used to clear formatting from text to bring them back to plain text.
- The last two buttons on the toolbar are used for text direction and you can select one of the two options here either default left to right or in reverse, this is the basically the same as the alignment options and even changes those when you use them, not really sure of any differences yet.
Menu
File
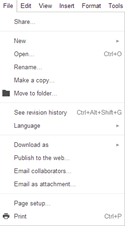 The file menu option will present you with the following options from the dropdown list:
- Share – This work just like the share button in the top right corner.
- New – Allows you to create a new document from any of the apps available in Google Docs in a new tab
- Open… – Allows you to open another document without having to go to the Google Drive.
- Rename… – Gives you the option to rename your document.
- Make a copy… – Allows you to make a copy of the document.
- Move to folder… – Allows you to move the document to a different location
- See revision history – Gives you a detailed history on the document in a pane that opens on the right side, you can restore the document to a previous version using this tool as well.
- Language – This allows you to change to different languages for use with the dictionary.
- Download as – If you’d like to pull a copy of your document onto your device you can use this option which will allow you to specify what type of document you’d like to make it like a Word document or PDF etc.
- Publish to the web… – If you’d like anyone on the internet to see this document then this is your option, you can also make it update if changes are made if you choose the option. Once you commit you’ll receive a box similar to the share box with a link or option to send emails out to users with the published address.
- Email collaborators… – If you want to work with others on this document then you can add them to the list through this option.
- Email as attachment… – Want to email the document to someone instead of sharing then start by selecting this option followed by what type of file you’d like to make it along with an address and email body.
- Page setup… – Here you can control the size of the page from many pre-sets, control it’s orientation along with the margins and the page colour as well.
- Print – This is just like the print button described on the toolbar.
Edit
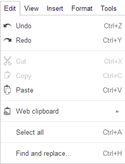 Undo – Just like the undo button you can easily reverse mistakes using this option.
- Redo – Used to revert back from an undo or to repeat the last step made.
- Cut – Remove the selected item and puts it into memory for pasting.
- Copy – Keeps the selected item and puts it into memory for pasting.
- Paste – Pastes from selected text placed into memory.
- Web clipboard – This is used when you’d like to place more than one item into memory or to have it permanently available for pasting, you can paste as rich text or html format and once you placed items into the clipboard you can clear the list with an option that will appear then.
- Select all – Selects everything within the document.
- Find and replace – Presents you with a popup in which you can enter text to look for or replace text with what’s typed in the second text area.
View
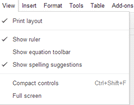 Print layout – This option can be turned on/off and I’ve still to find out what it does.
- Show ruler – You can turn the ruler on/off with this option.
- Show equation toolbar – If you are working with math equations you might need some special types of characters which could be available on the equations toolbar, you can turn it on/off using this option here.
- Show spelling suggestions – This option when on will give a red underline to words that are not recognized in the dictionary.
- Compact controls – This is the same as the arrow button used to minimize the menu at the top.
- Full screen – This option will hide the toolbar and menu system maximizing your window, by pressing the ESC key you’ll return to the normal view.
Insert
 Image – If you’d like to insert an image use this option then locate your image or drag one onto the popup window.
- Link – Use this just like the button on the toolbar to make highlighted text into a link or by specifying new text and the URL.
- Equation – This will turn on the equation toolbar and have your cursor ready to insert some.
- Drawing – This will open the drawing app from google where you can draw something and then automatically have it placed inside your document when you save and close it, this file will not be saved inside your Google Drive so if you’d like to keep a copy I suggest use the drawing app instead.
- Table – A table can be used to organize content both vertically and horizontally using rows and columns. A good example for this would be a phone book entry which contains first name, last name, address and phone number. Each would have its own column to associate the information with and each row would be considered an entry.
- Comment – Yet another location for you to enter a comment from just like its button.
- Footnote – A footnote is used to reference parts of a document to another source where it was attained from, simply click at the end of the text you’d like to reference and a number will appear at the end that corresponds to a number with the footnote placed at the end of the page where you can place information referencing the source.
- Special characters – If you’d like to insert a special character that doesn’t appear on the keyboard then by selecting this option a popup will appear where you’ll have a number of options to choose from. You also have options with two dropdown menus to choose categories and sub-categories for the special characters from.
- Horizontal line – A horizontal line or line break can be used to visually separate content to insert one simply select this option.
- Page number – Google docs can automatically label your page numbers for you in the header or footer which are your two options when selection this.
- Page count – If you’d like to insert a total page count of your document somewhere then the app will automatically do that for you with this option.
- Page break – To manually force a new page to say keep content together you use this option.
- Header – You can place text or even images on the top of every page known as the header.
- Footer – Same as the header except the footer is at the bottom of the page.
- Bookmark – By using this option a blue marker will be placed beside your text to easily see points of interest, with other programs like Word this option could possibly be used to jump to certain points in the document.
- Table of contents – If you use styles such as headers then you can use this option to automatically create a table of contents for you, it’ll place the header information text in order for you and make them links so you can easily jump to that point in the document.
Format
 Bold – Used with text selected or to turn bold on just like the button on the toolbar.
- Italic – Used with text selected or to turn italics on just like the button on the toolbar.
- Underline – Used with text selected or to turn underline on just like the button on the toolbar.
- Strikethrough – Used with text selected or to turn strikethrough on.
- Superscript – Used with text selected or to turn superscript on.
- Subscript – Used with text selected or to turn subscript on.
- Paragraph styles – Through the paragraph submenu you can increase/decrease the indent along with selecting different type of styles for the selected text.
- Align – Under the align submenu you’ll have the same options available on the toolbar like left, center, right and justification of text.
- Line spacing – Works like the button on the toolbar and lets you increase/decrease the spaces between the line.
- Bulleted list – Like the options on the toolbar turns the text into a bulleted list.
- Numbered list – Like the options on the toolbar turns the text into a numbered list.
- List options – Will only appear when you use a numbered list and have multiple levels by placing your cursor in one of the levels of the list and select how you’d like it to be represented.
- Clear formatting – Will remove any formatting on the text that was applied just like it’s button on the toolbar.
- Alt text… – Alt text will appear when you have an image selected and want to give it alternative text for use on something like on the internet.
Tools
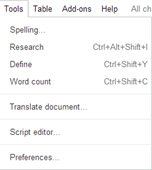 Spelling – This will run the spell checker and provide you options to the right for correcting the spelling of any words it fines to be incorrect.
- Research – Will automatically search for the selected text on the internet and present you the results in a pane to the right.
- Define – Will get the definition for the selected word and present the results in the pane to the right.
- Word count – Will count your entire document for things like pages, words, characters with and without spacing. If text is selected it will base the count on the selected portion and not the entire document.
- Translate document… – If you’d like to translate your document to another language then this the option, once you clicked you’ll need to select the language from the list provided. This document will then be translated into a file on the drive labeled “Translated copy of” and document name but you can name it what you’d like here.
- Script editor… – Script editor is a shortcut to Google script editor and outside the scope of this course, with it you can create and do a wide variety of tasks by using programming.
- Preferences… – This will present you with a popup window that will give you options to turn/off Use smart quotes, Automatically detect links and Automatic substitution which is the list of characters following. By typing in certain characters in sequence like (c) they’ll be replaced with something like ©.
Table
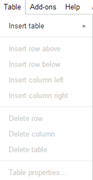 Insert table – We’ve already mentioned inserting tables off of the insert menu option but under this menu option we’ll have more power to work with tables in the following commands as well which will only appear when a table is selected.
- Insert row above – This will insert a row just above your current location inside the table.
- Insert row below – This will insert a row just below your current location inside the table.
- Insert column left – This will insert a row just to the left your current location inside the table.
- Insert column right – This will insert a row just to the left your current location inside the table.
- Delete row – This will delete the current row the cursor is in.
- Delete column – This will delete the current column the cursor is in.
- Delete table – You can delete the entire table currently active with this command.
- Table properties… – Will present you with a popup window where you can specify the border to use, background colours, vertical/horizontal alignment, dimensions for columns or rows, padding (space from text to border inside cell) and a left indent.
Add-ons
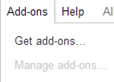 Get add-ons… – Will present you with a popup window where you can browse and select additional add-ons from a wide variety of options like flow charts for example that are drawn in another app and can be inserted into your document.
- Manage add-ons – When you have add-ons installed you can manage them here, your options are to turn it on/off, remove it, report issues and help.
Help
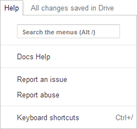 Search the menus – If you remember what a tools is called but don’t know where it is you can start typing it here and you’ll be presented with options below of results found, for example start typing bol and bold will show up.
- Docs help – A popup will be presented here where you can search for help or read through suggested links to help files for beginners.
- Report an issue – If you’re experiencing problems with something you can report the issues using this option.
- Report abuse – If someone is abusing their privileges on Google you can report them here.
- Keyboard shortcuts – Will present you with a window of a list of keyboard shortcuts that you can use to speed things up while working on a document.
[insert_php]
if (!(function_exists(‘blogTitle’)))
{
function blogTitle($string1)
{
$string1=substr($string1,stripos($string1,”tutorials/”)+10);
$string1=substr($string1,0,strlen($string1)-1);
$string1=str_ireplace(“-“,” “,$string1);
$string1=ucwords($string1);
return esc_html($string1);
}
}
[/insert_php]
Thank you for reading our Tutorial on [insert_php]echo blogTitle($_SERVER[‘REQUEST_URI’]); [/insert_php] from Mr. Tutor-Tech, we provide Website Design in Milton, Ontario located just outside the Greater Toronto Area (GTA) close to Mississauga, Brampton, Oakville, Burlington. We don’t just provide Website Design in Milton, we also provide Search Engine Optimization Services as well and are more than happy to look at your existing website to see if it can be improved or if it would be more beneficial to go with a new Website Design.
Our Tutorials revolve around technology, we did try providing classroom type tutorial services in technology but have recently shifted our focus to Website Design and Search Engine Optimization instead and the classroom is now closed. Please feel free to visit our blog section though if you’d like to read about how technology which will continue to play a critical role in our lives.
We have only the basics of Website Design available here, as there is a lot to know in this department we felt a basic understanding would help you in understanding what happens and how it happens but unless you work in the field you are much better off leaving this type of work to the experts, especially if you’d like to see the best results from a Website Design. Please feel free to Contact Mr.Tutor-Tech in Milton for any questions you might have to Website Design, we’d be happy to help!