
Music. 3
Video. 4
Pictures. 5
Libraries. 5
Playlists. 6
Streaming. 6
Windows Media Player. 6
Library & Playlists. 7
Windows Media Center. 7
Library & Playlists. 7
iTunes. 8
Library & Playlists. 8
VLC. 9
There are many different types of media players available out there iTunes, Windows Media Player and Windows Media Center are just a few of them. Each program does have differences and tools that one might prefer from one over another but for the most part when breaking down their basic functions they pretty much work the same. One other media player that I find particularly useful especially when playing videos is VLC.
File Types
There are several types of files that can be played through media players, they break down into three categories music, video and pictures. Depending on which media player you are using you might be able to play or view some or all of these. There are also different file types associated with each of these groups and depending on what player you are using you might be able to use some or all of these as well. Certain file types may belong to one company and therefore might not work with another, although this is rarely the case these days. Occasionally a media player might require what’s called a codec or a third party add-on to be able to play/view certain types of files.
Music
 An audio file is a way of digitally storing recorded sounds on your computer, there’s two parts to this actually one is the file type which is recognized by the extension of the audio file, such as .mp3 or .wav which act as a container, more on those in a second. The other part of this is the encoding and decoding of the file known as a codec and there could be several types available even within a single file type. Sometimes you might need to install additional codecs in order to play a certain file but be warned I’ve encountered several places stating they are the codecs needed just to find out they were actually viruses so try to find a reputable source (easier said than done). There is a long list of file extensions associated with music and they are basically grouped into three categories uncompressed raw, lossless compression and lossy compression. Raw uncompressed files take up more room but don’t really lose any quality some of these extensions are .wav, .aiff and .au. Lossless compression means the files have been compressed and if there is any quality loss it’s minimal, some of these extensions are .flac, .ape, .wv, .tta, .atrac, .m4a, .wma lossless and .shn. The last type is lossy compression these files tend to be the smallest in size and still have fairly decent quality like the popular .mp3, other extensions include .aac and .wma lossy. One other thing worth mentioning here is that almost all file extensions for music and including video or pictures tend to have a quality range with obviously its best setting taking up more file space than the worst one.
Video
 Video files work in the same way that music files do, there are a number of different extensions which are containers for video files beneath is the encoding that they use. This means that files of different file formats could actually be using the same type of encoding and obviously would need that codec to play it. When using a program like Windows Media Player you might encounter this problem and would need to install an extra codec which as mentioned earlier could lead to disaster, that’s why I prefer to use VLC as it tends to play just about any video file that I’ve encountered without the need to install any additional codecs. There are many different file types when talking about videos these include:
- .avi – a windows file type
- .mp4 – a format used by many video players
- .flv – used to deliever MPEG videos through flash
- .mov – apple’s file type
- .ogg, .ogm & .ogv – open standard containers, can be used by any media player should they choose to that is?
- .mkv – another open standard container that’s fairly popular
- .vob – the file extension used with DVD’s
- .asf or .wmv – another Microsoft type file
As mentioned these file extensions are mainly containers, underneath them is the encoding which vary with file extensions as well although some can share it and they are:
- MPEG (Movie Pictures Expert Group) – this encoding has versions from 1,2 and 4, the higher the number the newer it is and usually allows for better quality, compression or both
- 264 – is a compressed format that’s commonly used on the web because of that
- MJPEG (Motion JPEG) – codec associated with a stream of JPEG pictures from cameras that doesn’t compress well and therefore not really popular on the web
- WMV (Windows Media Video) – proprietary video usually belonging to Microsoft and includes a version of MPEG4
- DivX – these are codecs that are created by the company of the same name and are used with a number of extensions
- QuickTime – a type of codec implemented by Apple
These are among the most popular and common file extensions and codecs, there are many more and new one’s constantly appearing as well. Typically most media players cross over one another and can play most file types, it’s when you have troubles that a little bit of research will be needed to find out why. Armed with this basic knowledge and alerts that media players might give you  when not being able to play them you’ll probably be able to figure out what’s missing but as stated before try playing them with VLC which tends to be compatible with most file types and codecs. One last note on video files is that they all have frames per second (fps) the more frames the larger the file, frames are pictures basically that are taken every so many seconds the more frames the smoother the transition between frames.
Pictures
 Although we tend to use media players for either music or video, most of them can be used to view pictures or even better to play them in a slide show, this can usually be done fairly easily as well. There are many different types of image files just like anything when it comes to computers, once you’ve worked with a few you quickly become used to their extensions. The most common types are:
- JPG – this is the most common image on the internet and what most cameras use to take pictures in, it is considered a lossy file type meaning it compresses the image the more you compress it the lower the quality and more fuzzy the picture gets as you can see in our image of the camera above with a higher setting though you barely even notice any loss.
- GIF – is both lossy and lossless depending on how many colours are involved with 256 colours or less there is no loss in quality once you move beyond this colour pallet is when loss starts.
- TIFF – can be lossy or lossless as well depending if compression is used, there is a lossless compression called LZW that can be used with it as well.
- PNG – is a lossless file type that can contain many colours, along with the GIF format it can also have a transparent background whereas most of the others cannot.
- BMP – is a Microsoft format that is uncompressed and ends up being very large, not really used that much these days.
- RAW – is what some camera type’s use, they are a proprietary file formats that are uncompressed and usually require software from the manufacturer to view.
Libraries
 Each of the different file types we’ve discussed so far is typically stored on some type of media, usually an internal hard drive. It can also include external media like USB sticks, external hard drives, SD cards, CD/DVD/Blu-ray and can even include sources from the internet as well. Media players tend to use what’s called libraries to organize the files they’ll view/play, when viewing a file in the library you’re not viewing the actual file but what’s called a pointer or a shortcut basically. You typically either add files to a library by scanning for them and having the media center add them to it automatically, you can also choose what files you’d like to add to the library manually one by one or by folder and typically by double clicking a file or executing it the default media player will end up not only playing it but adding it to the library as well. The information that you view in the library regarding the file usually comes from that files meta data and can include a number of things like the name of the movie/song, the year, length, genre and more, not to mention it depends what type of file we’re talking about. Images can hold information about the camera it was taken from along with all kinds of camera settings, while music can have artist, genre, album etc.
Playlists
You can add files from the library to what’s called playlists with most media players, these lists are very similar the way the library works itself. These lists are a way of organizing the files you’d like to play, for example you could take all your favourite rock’n roll songs organize them in a certain order and save the playlist with a name like “Favourite Rock Songs”. Playlists can be saved in a number of different formats, each media player usually has its own default type but you might have other options depending on the player you are using, this way you can find a common file type between different players and open the playlist in it. In order for a playlist to work though these players need access to the files not just the playlist and these files need to be located in the same location as to where the playlist points too. One more thing about playlist is that they can be used in other devices such as portable mp3 players, car stereos and more.
Streaming
Streaming is referred to when you view a file from the internet, it’s not downloaded to your computer but has a continuous feed coming down. A perfect example would be a radio station broadcasting live over the internet, although there might be a slight lag as opposed to the actual radio station the file is continuously coming down your computer.
Windows Media Player
 Windows Media Player has been around now for over 20 years and first appeared with Windows 3.0. It’s capability of playing a wide variety of files has grown over the years and today supports most video, audio and picture formats. It allows you to sort files in its library in a wide variety of ways, supports multiple playlist extensions and can be used to transfer files to mobile devices such as mp3 players. It can also be used to burn music to a CD/DVD as well. Another neat little feature that I like about it is that you can rate your music, so that later you can easily find all your favourite songs. If connected to the internet the media player will continue to gather information on your collection such as genre, album art and more. This information can also manually be entered as well should it not be correct or should you want to name it something else. There’s also some advanced options that will blend your music together instead of waiting for one song to end and the other to begin they’ll overlap a bit, there’s also options for volume leveling which will try to balance the levels of music between one another so that one’s not incredibly loud and the other low for example. These aren’t default options they’ll need to be turned on or set. It also has a pretty neat thing called visualization which is like a fancy light show on your screen that flows with the beats.
Library & Playlists
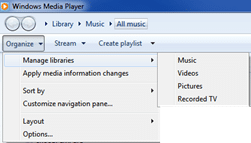 To add files to your library simply click on the organize button in the top left, from the drop down you select “Manage libraries” then the type of files you’d like to scan for? After that a dialog box will appear where you select the location of the folder you’d like to scan for those files. There are a few ways of creating playlists one of them is to click on the “Create playlist” button and then to select “Create playlist” from the drop down menu, you’ll notice a new list appear in the left pane under the Playlists heading, it’ll be highlighted and waiting for a name to be entered. Once you’ve named your playlist you can easily add any songs to it by right clicking them and then selecting “Add to” where you should see your playlist name or you can add them to the current playlist by selecting playlist. This playlist will not be saved and is just temporary, if you’d like to save the list you can simply click on the save list button in the top right.
Windows Media Center
 Windows Media Center first appeared with a special edition of Windows XP known as Windows XP Media Center Edition back in 2001. Although it looks drastically different then the Windows Media Player it plays most of the same files and with tuner cards you can add additional features like using it to watch live TV which you can record to your hard drive, this is known as a PVR (Personal Video Recorder). Depending on the tuner card you could possibly record multiple channels simultaneously, usually this can be done with 2 or 4 channels and again depends on the tuner card. Another great feature of Media Center is its ability to act as a server to what’s called Windows Media Center Extenders. This means you can store your files in one central location and share them with other devices connected to your network such as an Xbox located in another room.
Library & Playlists
In Media Center you pick the type of file you’d like to play by selecting Music for example and then when inside you right click to get a menu from where you can “Manage Library” to add/remove directories from the library list. Files will be added to the library after its done scanning. To create a playlist in Media Center while in the music selection click on the playlists from the top menu, from there you can choose to play an existing playlist or create a new one by clicking “Create Playlist” and selecting your songs, much easier to make in Windows Media Player and then just use here though.
iTunes
iTunes is a media player made by Apple, it’s fairly comparable to the Windows Media Player in some ways. It supports several types of files and most of their different extensions. Besides being a media player it also has the capability of connecting to the iTunes store, where you can get/purchase music or videos and if you have an iPhone or iPad then you might want to use it to get apps as well. iTunes can be used with the iPhone, iPad etc. to synchronize files, install updates and to send files to them. You switch between the player and the iTunes Store by clicking the button in the top right corner which toggles between iTunes Store and Library. If your device is connected, another button will appear just to the left of this which can be used to switch back and forth in the same way.
Library & Playlists
 To add music to your library in iTunes you can select the little icon with the arrow in the top left hand corner and then “Add file to library” if you want to add a single file. To add folders you need to access the iTunes menu which is now hidden, to do this simply click on the Alt key, from the menu choose file and then “Add folder to library”. To create playlists in iTunes you can start off by selecting the type of media you’d like to make a list for, Music for example from the top left just under the play controls. Then in the center near the top you’ll need to select “Playlists”, from here your current lists will be displayed on the left if you’d like to create a new one then you’ll need to select the plus sign from the bottom left. From here you have a few options you can create a “New
  Playlist” which will take you to another screen where you name your playlist and then drag the music you’d like to have in it over to the right pane. You can also organize your playlists in folders as well and can create a new one by selecting “New Playlist Folder” and then you can just drag and drop playlists into the appropriate folders. You can also create what’s called a smart list with iTunes by selecting “New Smart Playlist” in its dialog box you can select several criteria’s for what you’d like to have added to this playlist from the different lists and combinations made available, by clicking the plus and minus signs you can also expand the criteria to include several options. One last final option in iTunes is to create a Genius playlist, which first needs to be turned on, once that’s done it will scan you library and submit anonymous information to Apple. After that’s done you can select a song from your library and by right clicking on it you can select “Create a Genius Playlist”, iTunes will then create a playlist for you from the songs in your library that it thinks sound good or belong together, this doesn’t work with all songs for some reason or another. Alternately you can also select a genre from the Genius Mixes list and away you go….
One last thing to mention about iTunes and synching it with Apple devices is that you can only synchronize with one computer by default in order to be able to do it with other computers you’ll need to change some settings. You’ll need to authorize the computer by clicking the icon in the top left and selecting from “iTunes Store” the “Authorize This Computer” option.
VLC
 I mainly use VLC for playing videos as it does the best job of doing so, especially without having to install additional codecs. I can’ recall actually a time when this media player wasn’t able to play a video? It also has the ability of playing a wide variety of music and their extensions as well right out of the box so to speak. VLC’s library lacks luster, personally I find either Windows Media Player or iTunes a much better application for music but to each their own. Also because the library doesn’t really appeal to me I find that creating playlists to be a bit of a pain for music, works great for videos as you can select the folder or individual videos to add to the list which you can save, to do this simply right click on playlist and then select “Open Media” and make your selection from the menu there. One other feature I love about VLC is that I can use my smartphone as remote control for it through several different apps available, a few settings will need to be changed and usually the apps provide instructions for it in their help file or even an automated program you can download and execute to have it done for you.
[insert_php]
if (!(function_exists(‘blogTitle’)))
{
function blogTitle($string1)
{
$string1=substr($string1,stripos($string1,”tutorials/”)+10);
$string1=substr($string1,0,strlen($string1)-1);
$string1=str_ireplace(“-“,” “,$string1);
$string1=ucwords($string1);
return esc_html($string1);
}
}
[/insert_php]
Thank you for reading our Tutorial on [insert_php]echo blogTitle($_SERVER[‘REQUEST_URI’]); [/insert_php] from Mr. Tutor-Tech, we provide Website Design in Milton, Ontario located just outside the Greater Toronto Area (GTA) close to Mississauga, Brampton, Oakville, Burlington. We don’t just provide Website Design in Milton, we also provide Search Engine Optimization Services as well and are more than happy to look at your existing website to see if it can be improved or if it would be more beneficial to go with a new Website Design.
Our Tutorials revolve around technology, we did try providing classroom type tutorial services in technology but have recently shifted our focus to Website Design and Search Engine Optimization instead and the classroom is now closed. Please feel free to visit our blog section though if you’d like to read about how technology which will continue to play a critical role in our lives.
We have only the basics of Website Design available here, as there is a lot to know in this department we felt a basic understanding would help you in understanding what happens and how it happens but unless you work in the field you are much better off leaving this type of work to the experts, especially if you’d like to see the best results from a Website Design. Please feel free to Contact Mr.Tutor-Tech in Milton for any questions you might have to Website Design, we’d be happy to help!