
The Program Window.. 4
Menus & Ribbons. 5
Cut, Copy and Paste. 6
Dialog Boxes. 6
Settings. 6
Installing Programs. 7
Remove, Change or Repair an Installed Program.. 8
Navigating the Directory. 8
Attributes and Permissions. 11
Starting a Program
When working with Windows or almost any Microsoft based program you’ll quickly discover that there are usually more than one way you can do something inside the program or windows. Starting a program is a perfect example, the easiest and simplest way to start a program in Windows is using the Start button. From there you might see a program you’d like to fire up in the recently used area or if you pined a program to the top of the Start Menu. If not don’t fear by pressing or hovering on the All Programs part of the Start Menu you’ll see a shift happen and you’ll be presented with all the programs that Windows knows is installed on your computer, anything other than a folder icon will launch some type of program. Folders will open up other levels possibly containing even more folders called sub-folders. Typically developer’s control where their program will end up on the All Programs part, if it’ll be in the root or have its own folder is up to them initially but you can always move it to what suits you best afterwards. Even though every object will launch something it doesn’t necessarily mean that it’s what you are looking for, typically you’ll see this inside of folders for programs or suites. There will be readme files (information about the program), and possibly a number of other objects that point to other tools available with that program or suite. The objects also don’t have to be programs but could be shortcuts to other objects, this could be something on the web, a file location, directory location etc. Once you’ve played with Windows a bit you’ll begin to know what you want and where to go, just don’t be intimidated by all the icons as you’ll probably only use a small percentage of them.
 Now you can also start programs from the Taskbar at the bottom as well, some programs by default will be placed there but you can pin any program or file etc. to not only the Taskbar but also to the Start Menu as well simply by right clicking on the object, this will present you with a menu of options from which you can choose where you’d like to pin it along with other options like Run as administrator which is needed sometimes when programs need certain privileges to run properly, most of the time you should be just fine, without this step. Be cautious with the Remove from this list option especially if you don’t know where the program is or how to add it back to the list. Properties will give you a number of options along with more information about the program or shortcut you are looking at. Items on the Start Menu are shortcuts to actual programs located somewhere else, from the properties tab you can find out where, you can also find options here to run this program in compatibility mode which will simulate XP or another Microsoft OS to run a program on it, some older programs won’t run properly on Windows 7 and might need this. In the same area you can also set to run the program as an Administrator so you wouldn’t have to right click and do it every time. A third way to start a program is to navigate to the file location and start it from there, you can get this information from a shortcut using the properties option or by simply knowing where it is. Typically you’ll find most programs off the Root in the Program Files or Program Files (x86) folders, the difference here is usually the architecture of the program either 32 or 64 bit. Another quick and simple way to find it is through the quick search simply start typing the name of the program and you’ll more than likely see it appear in the Start Menu .
The Program Window
 Now that you know how to start a program, let’s take a look at your typical Window inside of Windows. A Window is a graphical box on your screen that represents a program, its functions and information are contained within it. Typically a program runs inside of a single window but some programs when you have multiple files open will contain multiple windows, this is all depends on the program and sometimes optional settings inside of the program. What you’ll see with almost all the windows is the option to:
- Typically programs have an Icon in this corner which when clicked on will present you with options to move the window, minimize or maximize it and close it as well.
- This is the minimize button which means you’re window will disappear and be hidden somewhere off the view of your monitor so to speak. To get the window back you’ll either need to switch between programs or click on the program icon down on the taskbar and make the window active again.
- This button will actually change depending on what state your current window is in, here you’ll get a square box which tells you that you can maximize the window. This means it will take up your whole monitor from top to bottom and side to side. When your window is maximized this button will look slightly different showing a smaller box inside of a bigger one. Hovering over it will now say Restore, which means taking it back to the size it had before maximizing it.
- Is the close button and will shut down the program you are currently using, just remember to save your work as some programs might not ask you before shutting it down.
The area at the top of the window is known as the Title Bar, typically this used to blue and easy to see but the newer Windows versions make them clear like today which to me makes it a bit harder to spot at times but not impossible. You can do several things with your mouse over the title bar or around the window itself. By double clicking on the title bar, between 1 and 2 of the picture above you’ll maximize or restore you window depending on the current state. You can also hold the left button down and drag this box around to anywhere on your screen. With Windows 7 if you drag the window to the top it will maximize the window as soon as you touch the top, dragging it to either end side of your monitors will make it take up half the screen size and dock it to that side of the screen and grabbing it and pulling it away will restore it to the previous size. By putting your mouse at the edge of the border of the window on any side you’ll typically get double arrows which tell you that you can resize the window, simply left click and hold the mouse button, then drag the window to the desired size. If you go to one of the sides of the window you’ll only be able to resize in that direction but by going to the corner you’ll get diagonal double arrows that allow you to adjust width and height at the same time. If you’d like to minimize all other windows then click and hold the left mouse button on the title bar and shake the window back and forth, this will cause all other windows to minimize and if you do it again this will restore them.
Menus & Ribbons
 For those that are familiar with older versions of Windows will probably recognize the menu system easily. This is where you find all the options available by the program you are using, typically the first item you see on the Menu is the File option which will display a dropdown menu when selected and allow you to save, open and close your file along with other options. Other typical options from the Menu are Edit, which usually has tools for changing your document and is home to Copy, Cut and Paste most of the time as well. Another typical Menu item is the Help menu which will present you with limited options most of the time, on average there’s only a few listed here one will allow you to search for help or take you to the help files for that program and another one usually says “About” and then the program name, will allow you to see what version of a program you are running. Another common Menu item is Tools where you usually find the option for settings, which control options for that particular program and if the item or option isn’t there then you might find it under File or possibly one of the other Menu items (sometimes you need to press certain key combinations as well) otherwise the program might not have one.
A version is a number associated to a program that tells the user/programmer when it was made kind of. This could be a date if used with something like Office 2003 or it typically looks something like this “Version 4.405” what this means is that the program is on its 4th version and there’s been other updates involved as well hence the .405.
 With newer version of Microsoft programs you might notice a different Menu type system which is called a Ribbon, from the picture above we have:
- A quick access toolbar, in this circumstance paint allows you to quickly save a document, undo or redo operations done it.
- Is referred to as the backstage area where you get presented with options pertaining to the program itself like saving and opening files, print settings and program settings.
- The Ribbon is the bar running across the top just below the quick access toolbar and is divided into groups here we see Clipboard, Image, Tools, Shapes and Colors as the groups, within them are tools associated with that group.
- These are tabs which change the ribbon to display tools and groups associated with the tab name you’ve selected. You can think of these as menu items (tab), sub-menu items (groups) and actual items inside the group.
Cut, Copy and Paste
Cut, Copy and Paste go back a ways and to people using the computer back then were probably amazing but compared to the stuff our computers today seem like a Joke now, I bet you’d cry though if they were to go away so don’t underestimate their power. Copy and Cut work more or less in the same way they take the selected item and put it into memory, only difference is Copy will leave the original and make a copy of it and Cut will remove it once it’s pasted. Pasting simply means putting the object in that location. This behaviour depends on what you’re selecting and where you’re trying to paste it. If it’s an image then you’ll a picture in memory and need a program to paste it to that will understand. However this operation is not just limited to pictures or text inside of a file but can be used on programs/files and even directories themselves. If you’d like to make a quick copy of a file simply right click and select copy from there you can paste it in the same spot or somewhere else, if it’s the same spot you’ll get prompted, something saying this file already exists. You’ll have a few options here one of them is to overwrite the copy and with the new one known as replace, you can also paste and rename the file so that it has copy and a number appended to the file name or you can cancel the operation all together.
Dialog Boxes
 Dialog Boxes are windows that pop while you are trying to do something typically they are a warning or a question resulting from your action, they can say something like you can’t perform the current operation because of a certain reason or something like we just explained in the previous paragraph where you’re asked if you’d like to overwrite the file, rename it or cancel the operation. These types of dialog boxes usually lock the program you are using or all programs until you answer the question or close the dialog box, usually you’ll see an icon appear on the taskbar showing the dialog box and it will be flashing as well, another sign might be the window is slightly greyed out.
Settings
 If you are using a program there’s a 90{463c70c279fb908728b910a090d44fbe4ae7aabcd875de9c1a518a8c8e2be8bd} chance that it has settings for it which you can change. The location of where you find these settings will vary from program to program but a few of the spots were mentioned under the Menus & Ribbons section. These settings all depend on the type of program you are using and can be extremely complicated or fairly easy based on the program itself. A number of programs like to add options so that the program will start when you fire up Windows itself. If you find a setting that says “Start program name during start up” this is the option that causes it to do so, simply uncheck this and the next time you start-up that annoying program should stay put. This can help speed your system during this phase especially if the program isn’t used that often.
Installing Programs
 Installing programs on Windows is fairly easy, with AutoPlay when you insert a CD/DVD or Blu-ray disc into your computer you’ll usually get prompted after it examines and mounts the media. The dialog box will usually present you with options from opening up the media inside of windows explorer or to execute certain instruction and other choices which may include play this disc with Window Media Player if it’s music or video. If this doesn’t come up you can always open windows explorer and navigate to the media, typically in the root folder of the media you’ll find something that says Install or Setup, if they are using different type of wording then you can usually identify it by the file type or extension which is .exe for extension or file type of application or executable, usually they’ll be just one in the root folder but if there are more look at the file names they’ll usually give you a good clue of what they’ll do. Once you’ve started the installation process you’ll usually receive dialog boxes of some type asking you to agree to terms and conditions, giving you information about the product and warnings. Typically if you have no options you can just click next but be cautious before doing so as a lot of program installations have hidden questions that will install other software on your computer usually really annoying ones, that you don’t need, don’t trust or want so you might have to remove checkboxes or decline offers of these programs, it really does boil down to installing enough programs to recognize these pit traps as they hide them fairly well now a days. After executing you might get a prompt asking if you are trying to run a program, say yes.
 Normally you should get questions asking you where you’d like to install the program and unless you have a reason to do otherwise the default should be just fine. Other questions are something like “Default”,”Express” with “Advanced”,”Custom” as an alternative. Don’t let the words Advanced and Custom scare you usually this route already has the default selections checked off so if you see anything in there you know you’d like to change then you can do so. Sometimes programs come bundled together in what’s called a suite, they usually include extra add-on stuff you can install and typically need to be changed through the custom or advanced option. Other options might require detailed knowledge about the program your installing so don’t get to brave out there.
You can also install or get software outside of the disc format by downloading it off the Internet or getting it from someone for example. Although there’s nothing safer than a store bought disc the option is still there and since it is here are a few things you should consider while doing so. The first and most important thing I’d like to say is make sure the source where you’re downloading it from is a safe source, how do you determine this? My rule of thumb is if I’ve heard the name before and it’s a bigger business then you’re good, unfortunately there’s websites out there that will masquerade themselves to look like these sites so make sure you are the right site by looking at the URL. For example www.microsoft.com is good but something like www.microsoft.ggbb.com isn’t. When looking at domains on the internet read from right to left so the domain name on the last URL is ggbb.com and probably has nothing to do with Microsoft except for the trickery they’re playing on you. You can also research the site name to see if anyone is saying anything about it, sometimes you’ll have no choice but to try it to fix the problem you might be having in which case, make sure you back up your stuff as this could be your last chance.
Remove, Change or Repair an Installed Program
 After you’ve installed programs you’ll easily find them in the Start Menu because they’ll be highlighted in yellow for you. Now say you don’t like program you installed, or it’s the wrong program altogether what do you do? If you want to change something in the installation or repair a broken program, again what do you do? The answer starts off by going to Programs and Features of the Control Panel, from there you’ll see a list of programs installed that windows knows of. After clicking on it from the list you’ll be presented with the option of uninstalling the program and depending on the program itself you might also be able to change parts of the installation, you’ll know if the option is presented or not like in arrow 3.
 Arrows 1 and 2 will take you to another menu, from arrow 1 you’ll end up viewing Windows updates that were installed on your computer and be able to remove them. If you’re wondering why I’d want to remove an update, sounds wrong and if it’s an update should I keep it? The problem with updates is sometimes Microsoft is unaware of a certain conflict between it and say a certain piece of hardware installed on your computer possibly, all of a sudden you’re having troubles and things aren’t working properly. If your diagnosis ends up being an update problem then you have the power to remove it.
Arrow 2 will take you to another dialog box, which will display all the built in window programs that you can add on to your installation. Typical users might be after just the games that Windows has like solitaire, chess, hearts or minesweeper. This is where you’d find them along with other more complicated stuff like web server settings and much more.
Navigating the Directory
 Now that you’re a little more familiar with what’s going on inside windows let’s talk about the Directory for a little bit. We’ve already mentioned that everything in Windows is located in a file folder somewhere including Windows itself, this is all listed off your main hard drive the one you installed windows on. Along with any other hard drives or other media you might have you can quickly jump around using Windows Explorer which can be started by clicking the folder on the taskbar at which point the following window will appear.
- This is the current location where you are at, as you see in our example its Libraries. This is Microsoft’s replacement for My Documents sort of it contains the shortcuts to the Documents, Music, Pictures and Videos libraries. These are like folders except they can contain several folders under them so you can for example include two hard drives of videos under one spot. Just as a note some options might not be available to you through the libraries view and you might actually need to go to location of a particular file to do certain things in which case try right clicking the object and if the option Open File Location is there you can just click that and it’ll take you to it. A an actual file location will represent itself by saying computer first then separated by an arrow a drive letter for the hard drive you are viewing and then after another arrow the directory then sub-directories after that. The arrows will display options available at the particular level or if after a folder that folders sub-folders will be displayed. This is called a breadcrumb, a trail where you can click back to whatever level you’d like too and you’ll jump to it. By clicking in the address bar you’ll get the old way of displaying the location that is still used in the background for a lot of things so copying it to paste somewhere could be a good idea to avoid mistakes in typing.
- Is a list of favorite locations like the desktop which is actually a folder inside the windows structure as well?
- Are short cuts to the view we just described above in number 1.
- Are shortcuts to networked computers if there are any they’ll appear here when Windows discovers them?
- Sometimes searching the computer for stuff is easier and this is another spot where you can do so. Remember you have a quick search available to you off of the Start Menu well this behaves in the exact same way you just have more options here to help filter the information found. Also for your information the Start Menu quick search will have an option at the bottom to View More Results and this is where it will take you by automatically entering the word and pulling back the results. By writing a word inside the search Windows will search through all the information for anything containing that word or that part of it. You can filter out some information by limiting the date range or size of file which is presented at the bottom of the dropdown menu. Two more things to mention here are you might get a prompt near the top saying this drive isn’t indexed, in order to perform faster search’s you’ll need to index the drive. To do this simply right click the text box and select the selection to index this location. The other thing worth noting is that the results will show up inside of search window which acts like a virtual folder kind of like the libraries for music, pictures. Since all the results are found in different locations you might not be able to do certain functions on the object or you might want to see what else is inside it’s directory as well, you can right click here and select Open File Location to get there.
- This button gives us the option of viewing the objects differently from small icons to bigger icons and more details like date modified, file type, file size and more can all be displayed depending on the view you choose, you can shift back and forth as much as you’d like and this doesn’t affect the computer at all so experiment with it to see the different views available. Another neat way of controlling this option is while inside of the window hold down the CTRL button on your keyboard while spinning your scroll wheel on your mouse, this will zoom you in and out causing the objects to shrink and grow along with hiding or displaying more information. This is also a zoom in and out trick used on internet browsers as well.
- When viewing pictures you might want a bigger preview you this will open up another pane that will display the pictures or sample of the file in. It’s used as a toggle button so you can turn it on or off here.
- Need some help, have a question or want a more technical explanation of files and stuff this button will take you there.
 Now that we’ve gotten the window out of the way let’s talk about the files and directories themselves for a bit. From the root directory of your main drive we’re displaying several folders, inside them are more folders and files like the one listed at the end of this directory labeled END. You can tell the difference between files and directories by the folders, which are directories and contain more stuff inside them. Sometimes depending on how its set these folders will display a bit of what’s inside of them like a few pictures or album covers. You can picture your hard drive like a filing cabinet with files inside of them that are contained inside folders possibly inside of other folders. This makes it easier to find things, in our picture you’ll also notice a few directories labeled PerfLogs, Program Files, Program Files (x86), ProgramData, Users and Windows, these belong to the Operating System and although you can make changes to them you should do so with caution and/or experience.
Attributes and Permissions
 Some other stuff you should quickly know about that won’t be covered here is that files and folders have users associated with them along with permissions. These users can be associated to groups for example the Administrator group which means any user inside that group will contain the same permission unless specifically declared otherwise, this is why Administrator users can view all the information on the computer but at a cost, they have to claim possession of a file or folder so if you’re being prompted for something like that it’s more than likely that some Administrator went into that file or folder all you have to do is
  reclaim it. There are also two things associated with files and folders that involve some type of security. One of them is attributes which tell you that the file is maybe a read only file or hidden, this will hide the file or make it readable and the user won’t be able to overwrite or change its contents. This doesn’t mean the user can’t change these settings though, especially if they have permission to do so. This is where the real security comes in because you can limit what users can do and see with files and directories using permissions from the security tab through the properties of the object. Unless you know what you’re doing here though I don’t recommend fooling around you could lock yourself out of the computer.
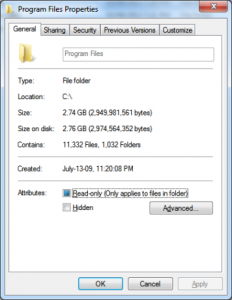
In our first picture on this page we clicked on a folder and selected properties at the bottom you’ll notice the attributes associated with this folder, the blue shade in the Read-only means some files/folders inside of it are read-only. You can also see other file information here like the type, location, size of it or files contained inside of it as in our example. If it’s a folder it will also list how many files it contains and other folders as well. The second picture off of the same dialog box is under the Security Tab, here you can find the permissions set for the file or folder and make changes by selecting Edit or Advanced, remember attributes can be changed by anyone with access to it permissions will restrict the user completely and is for the most part taken care of fairly nicely by Windows but depending on your needs you can if you’d like make changes to them, again just proceed with caution!
[insert_php]
if (!(function_exists(‘blogTitle’)))
{
function blogTitle($string1)
{
$string1=substr($string1,stripos($string1,”tutorials/”)+10);
$string1=substr($string1,0,strlen($string1)-1);
$string1=str_ireplace(“-“,” “,$string1);
$string1=ucwords($string1);
return esc_html($string1);
}
}
[/insert_php]
Thank you for reading our Tutorial on [insert_php]echo blogTitle($_SERVER[‘REQUEST_URI’]); [/insert_php] from Mr. Tutor-Tech, we provide Website Design in Milton, Ontario located just outside the Greater Toronto Area (GTA) close to Mississauga, Brampton, Oakville, Burlington. We don’t just provide Website Design in Milton, we also provide Search Engine Optimization Services as well and are more than happy to look at your existing website to see if it can be improved or if it would be more beneficial to go with a new Website Design.
Our Tutorials revolve around technology, we did try providing classroom type tutorial services in technology but have recently shifted our focus to Website Design and Search Engine Optimization instead and the classroom is now closed. Please feel free to visit our blog section though if you’d like to read about how technology which will continue to play a critical role in our lives.
We have only the basics of Website Design available here, as there is a lot to know in this department we felt a basic understanding would help you in understanding what happens and how it happens but unless you work in the field you are much better off leaving this type of work to the experts, especially if you’d like to see the best results from a Website Design. Please feel free to Contact Mr.Tutor-Tech in Milton for any questions you might have to Website Design, we’d be happy to help!