
Desktop Background. 3
Window Color. 4
Sounds. 4
Screen Saver. 5
Change Desktop Icons. 6
Change Mouse Pointers. 6
Themes. 6
Change Your Account Picture. 6
Display Settings. 7
Adjust Resolution & Change Display Settings. 8
Calibrate Color. 9
Adjust ClearType Text. 9
Set Custom Text Size(DPI). 9
Customize the Start Menu. 10
Customize the Taskbar. 10
Customize the Notifications Area. 11
Toolbars. 11
Customize the Clock. 11
Personalizing Windows
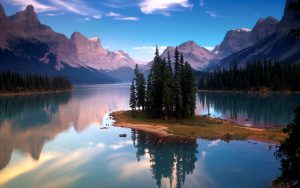
Although Microsoft has a nice look to its Windows Operating System, having the capability of adding your own look and feel to it make it all that much more personal, something about it just says this is me and my computer, like maybe this background which comes from the Canada theme available by default but you don’t have to stop there you can have any number of backgrounds available from the internet and with Windows 7 you can have them in a folder where you’ll have the change every so often as well so that you won’t get bored. There’s also a lot more personalization available then just this you can control how just about everything in windows looks.
Desktop Background
 You can have any picture you’d like to put on your desktop, the higher the quality the better especially with today’s monitors and video cards. You can
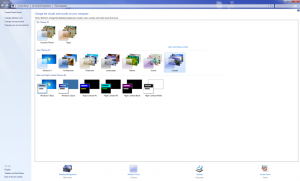 also have as many pictures in a folder as you’d like (provided you hard drive can handle it) and have Windows either cycle through them or jump randomly within a certain amount of minutes. To do this you’ll need to go to your control panel and select personalization or if you’d like you can right click on your desktop and select it from the menu. From there you’ll be at the main window for personalizing Windows 7. From there you can click on Desktp Background at the bottom which will change your screen to the control the background. Here you can choose from the dropdown list from the options available one of them will be the shortcut to your pictures library so if you have all your pictures where they should be you can quickly choose from your favourites or you can always use the windows theme’s availble and you always have the capability of browsing for a picture that might be in a different location with the Browse button. If you have multiple selected then at the bottom you can control how you want the picture to show up inside your desktop from stretching it to tiling it etc. (play around) and then the frequency of how often it should change along with if it should be randomized by checking off Shuffle. When your done simply click Save changes in the bottom right.
Window Color
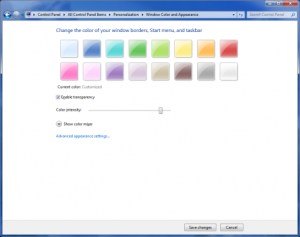 You can control all the Windows native parts of all windows through Window Color option at the bottom, here you’ll be presented with a simple dialog box where you have a number of default colours to choose from by using the Color intensity bar you can control how dark or light they are as well. With the Color Mixer you can also create your own colour. This controls the frame around the Window along with the Title Bar area. With the Advanced appearance settings you can control a number of different things from native windows parts, a sample will be displayed and will reflect the changes you are making so feel free to experiment if you do something wrong simply click cancel instead of OK to keep the current settings you had in place. If you find the transparency setting of the title bar annoying you can turn it off here by removing the checkmark.
Sounds
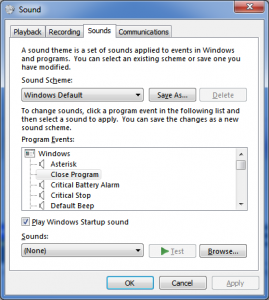 Windows has all kinds of sounds that notify of certain events like a ding when something crashes, chime type sounds when you start-up or login/out etc. There is a long list of events that can have sounds associated with them and a good portion of them don’t have any sound at all assigned to them. If this is something you like then you can make your computer sing to you for all types of events and you’re not limited to boring Microsoft sounds you can use your own as long as they are in a .wav file format, there’s also tons of programs out there that will convert music files from other types of formats to a .wav format should you want something like an .mp3 or part of it to be your sound, so you can always make custom ones as well. From the dialog box you have a few choices you can make, first you can go with a sound theme from the list of available options. You can use the theme the way it is or modify any settings whenever you’d like by selecting the event and then associating a sound with it. Sounds are available from the dropdown list and you can hear them by pressing Test, if you’d like to find your own just use the Browse button and go to the location. The sound Windows uses during Start-up is an option, by removing the check it’ll no longer be present, unfortunately this is the only sound you can use at this stage. When you’re all done changing your settings, you can click the Save As button to create your own theme.
Screen Saver
 Screen savers were created back in the day because the computers back then didn’t know to shut down or go to sleep while being idle for some time and would/could leave a picture on the monitor glowing for the whole day and night, in which case when you came back and saw it some form of anger would kick in, why? Chances were that your expensive piece of equipment the monitor was ruined unless you wanted the picture you had on all night permanently displaying from your monitor, even when it’s off. The solution to this problem started off with screen savers which are images that constantly change on your monitor avoiding the ghost image by not letting a single pixel look the same for more than a certain amount of time. The screen saver typically comes on after the computer has been idle for some time which you control, it can also put your computer into locked mode so if you walk away from your computer and forget to do it.
Although this does solve the ghost image issue, there are several draw backs to using it today. The first thing worth mentioning is that monitors are not as expensive as they used to be, this doesn’t mean I’d like to throw my money away on new monitors all the time instead. Fortunately most new monitors today don’t suffer from these same issues, technology inside of most of them prevents this now. Another drawback is that the screen saver consumes resources from your computer when they are working and while they check to see if they should turn on as well. Yet another disadvantage is that monitors typically work for so many hours by using the screen saver you are taking away from that life span. Today’s computers have power settings which will not only put the computer to sleep when idle for a certain amount of time but can shut down the monitor as well, saving you some electricity and life on the monitor itself. This can be controlled through the Change power settings link near the bottom of the dialog box. This will give you another dialog box where you can choose from existing plans or you can create new ones as well. A plan can have different settings and you can quickly shift between them if the need is there, this is most useful with laptop type devices as they’ll have plans that behave differently when plugged in or when running of battery power. So you could for example have the monitor shut off after 2 min when using the battery and 10 min when plugged in. By clicking on Change plan settings you’ll be able to change two settings in the next dialog box one for the monitor and the other for the computer and after how much time they should be put to sleep, just remember to Save changes when you’re done, you can also use Change advanced power settings to control some of the more specific areas.
Change Desktop Icons
![]() The change desktop icons dialog box will allow you to display certain icons on your desktop by checking them off from the list by default only the recycle bin will appear but you can also add Computer, User’s Files, Network and Control Panel to it as well. You can change these icons as well by selecting the icon you’d like to change and then selecting the Change Icon button, this will give you a list of icons available from Microsoft but you’re free to browse for your own as well, using the Browse button.
The change desktop icons dialog box will allow you to display certain icons on your desktop by checking them off from the list by default only the recycle bin will appear but you can also add Computer, User’s Files, Network and Control Panel to it as well. You can change these icons as well by selecting the icon you’d like to change and then selecting the Change Icon button, this will give you a list of icons available from Microsoft but you’re free to browse for your own as well, using the Browse button.
Change Mouse Pointers
 If you’re not too keen on the mouse pointers provided by Windows you can change them as well. This includes the hour glass when things are happening, along with the different states in which the mouse pointer changes, like the pointing hand over links, cross hairs, adjustment arrows and more. You can browse from a list of Schemes or change them individually as well, not to mention save the changes after so you can quickly change from and back to them if you’d like too.
Themes
 There are several themes available by default, what this means is someone went through the trouble of changing a number of the items we mentioned above to go along with some type of theme like nature possibly. This could include sounds of waves crashing, pictures of water falls or beaches and more, Windows has a number of default themes you can choose from but there are also a ton of them available on the Internet, just be careful where you go you wouldn’t want a virus and you can always make all the changes you’d like to and save your own theme if you’d like.
Change Your Account Picture
 When you are at the login screen or in your Start Menu they’ll be a default picture associated with your account. You can change this here if you’d like, simply choose from the pictures available or browse for one of your own and click Change Picture when done.
Display Settings
 There are a variety of monitors around today and at decent prices especially compared to the anchors I used to use and the price that they cost, some of the monitors I had were more expensive then the computer. They might have been really good monitors at that time but nothing compared to what we have today, not only do we have much bigger screens but we also have flat screens now which actually leave us desk space after putting them on top. Before playing with the settings let’s talk about some of the ways to measure the quality of a monitor.
- Most of the monitors all display the maximum amount of colours but the specification is still there and is typically 16.7 million colours.
- Monitor size, this is the screen size you’re monitor has and is usually displayed in inches (“), this measurement is taken diagonally from one corner to the opposite. So your height and width depend on the ratio of the monitor which is next.
- Most square monitors have disappeared now but obviously you can visualise it compared to the widescreen monitor you probably have facing you today. The ratio for the square one’s was 4:3 and most of the widescreen’s are 16:9, what this means for every 16 units of measurement up and down you’ll get 9 left and right, the units are not important as the ratio will keep them 16 by 9. So if it measure 20 inches up it would be it would be 11 ¼ inches wide. Math behind it is 20/16=1.25 then we take 1.25 x 9 and get 11.25.
- Resolution is probably one of the most important factors behind the monitor, it’s the amount of pixels that are displayed inside your monitor. A pixel is a dot basically which combined together with a whole bunch of dots come together to form a picture. Something to note is that a pixel his slightly higher than wider that’s why the square monitor has a ratio of 4:3 as well. You can see what’s called pixilation happening in the picture we have here of the explorer symbol, you can also see the dots a little bit easier as well because of it. Pixilation usually happens when you zoom into an object and there are not enough pixels to clearly shape it this is why monitors with more pixels display clearer pictures, the pictures also tend to be smaller because of this as well but you can always use larger fonts or zoom in. Typically you’ll see resolution measured by pixels like 1920X1080 with computers whereas TV’s will typically say something like 720i, 720p, 1080i or 1080p. The number represents the amount of horizontal lines. The letters represent either interlaced or progressive.
- Progressive – is the better of the two and means that all the lines on the monitor get refreshed together, we’ll be talking about the refresh rate next it’s just what it sounds like.
- Interlaced – means that every other line gets refreshed and then they switch on the next refresh. So let’s just picture the first few lines for a second, so on the first refresh lines 1, 3, 5, 7, 9, 11 and 13 would get refreshed and then on the next cycle lines 2, 4, 6, 8, 10, 12 and 14 would get their refresh.
- Refresh rates are how fast the monitor can be refreshed, meaning taking a picture presenting it, clearing it and then presenting another picture. This is technically what happens with videos or moving objects on your screen. Depending on the monitor and what type of technology it uses you’ll see things like Milliseconds (ms) and/or hertz (ex 60 Hz). The lower a ms refresh rate is the better and the higher a hertz rate the better that is.
- Contrast is the measurement between the brightest and darkest colour a monitor can display the higher the contrast ratio the better, there’s no real standard for measuring contrast so you’ll see it mentioned in a variety of ways, you’ll just have to do the math.
- Brightness is another measurement for the monitors quality the brighter the better, you can always dim it if you needed to. This can be displayed by cd/m2 which candela per square metre, king of like candles when measuring spot lights. Here the higher the number the better.
- The last thing to note is how the monitor connects to your computer the old connection VGA although is still around will not get you the resolution that some of the other cables do like DVI or HDMI. Also HDMI transfers sound as well in one cable depending on your video card and I believe the type of HDMI, early generations might not have had it. Another thing to be careful about is removing them while they are on VGA and DVI should only be done with power being off otherwise you could possibly short your computer, HDMI doesn’t matter as far as I know.
To get to the display section you’ll need to click the display link in the personalize window. Once you’re there you’ll be able to change the following settings for your monitor.
Adjust Resolution & Change Display Settings
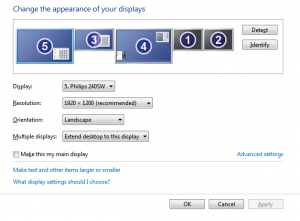 Both of these take you to the same screen and it’s where you come to configure your monitor(s), with Windows you can have several monitors hooked up all you need is multiple graphics cards or multiple outputs on the cards and you can do both like I’ve done to get 4 or more monitors running. This window is where you control where they appear to each other, along with that you control the way they display landscape (default) or portrait should you stand you monitor up sideways. You also select which monitor will be the default along with the resolution they will each have, the default monitor is where you’re taskbar will appear but you can drag it anywhere you’d like or change the default if you’d like to do it that way. By clicking the Advanced button you’ll bring up a dialog box giving you details on the video card that monitor is connected to along with other information but I’d just like to bring your attention to the monitor tab here you can increase the hertz that’s being sent to your monitor. Typically resolution and hertz are detected by Windows and it usually won’t allow dangerous settings but that’s not a guarantee make sure you know what your monitor can handle so you don’t wreck it.
Calibrate Color
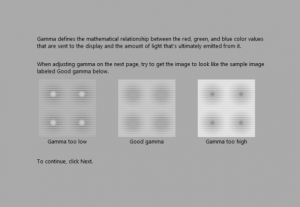 This little tool will help you adjust settings so that your monitor will be set to the proper specifications. Before you proceed you should reset your monitor settings to the factory default, it’ll actually tell you this on the second step. It will also require you to use your monitor’s menu system to adjust things like brightness and other settings while going through it. Each step works on a particular setting and will provide you with instructions on what you are trying to achieve, worst case scenario is just reset everything back to normal afterwards.
Adjust ClearType Text
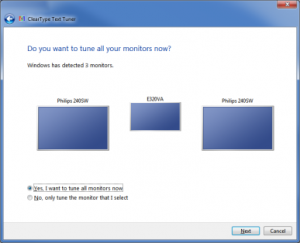 This link will present you with a dialog box which has a number of steps involved to tune each monitor if you choose to present text clearly for you. By going through each question you’ll be asked to select the clearest text, going through several selections you’ll have that particular monitor calibrated for text and can continue on to the next one until you’re done all of them. Typically I haven’t had problems with default settings but it doesn’t hurt to tweak something to run to its full potential.
Set Custom Text Size(DPI)
 DPI refers to Dots Per Inch and is typical a term used in printers and scanners but it applies to the monitor and text as well. If the screen you’re on currently doesn’t have the right percentage for the size of text you’d like then you can make a custom size using this link. Once you’ve clicked it you’ll receive a dialog box where you can drag the ruler left or right to increase the number in the box or you can just type
 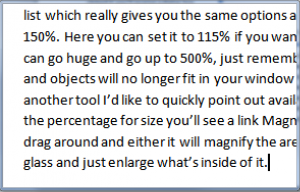 it in manually if you’d like too or select a value from the drop down list which really gives you the same options available on the previous screen and that’s 100{463c70c279fb908728b910a090d44fbe4ae7aabcd875de9c1a518a8c8e2be8bd}, 125{463c70c279fb908728b910a090d44fbe4ae7aabcd875de9c1a518a8c8e2be8bd} and 150{463c70c279fb908728b910a090d44fbe4ae7aabcd875de9c1a518a8c8e2be8bd}. Here you can set it to 115{463c70c279fb908728b910a090d44fbe4ae7aabcd875de9c1a518a8c8e2be8bd} if you wanted something in-between 100 and 125 for example or you can go huge and go up to 500{463c70c279fb908728b910a090d44fbe4ae7aabcd875de9c1a518a8c8e2be8bd}, just remember by making the percentage bigger chances are your text and objects will no longer fit in your window properly and will become hard to read things. There is another tool I’d like to quickly point out available of the previous screen, just above where you choose the percentage for size you’ll see a link Magnifier, this tool provides you with a magnifying glass that you drag around and either it will magnify the area you’re focused on or use a window like a magnifying glass and just enlarge what’s inside of it.
Customize the Start Menu
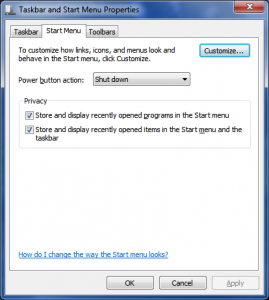
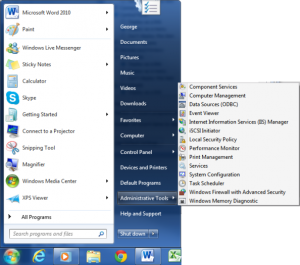 As we mentioned in one of the earlier tutorials you can customize the Start Menu, we’ve already talked about pinning to it but here’s a refresher of what that means. Basically you can pin anything to your Start Menu you by right clicking it and selecting Pin to Start Menu. This will place that object at the top area of your Start Menu, if you’d like to change its location just drag it to where you’d like to appear just keep above the break line of the next section where all the recently used programs appear. By right clicking the Start button you can select properties and receive the dialog box shown here, from it you can choose what the default option is of the bottom of the Start Menu where by default it will have Shut Down, depending on your computer you can have hibernate, sleep or logoff as the default option and the rest will appear through the arrow beside it. The two checkboxes will display recently used programs or items to the Start Menu. By clicking the Customize button you’ll receive another dialog box with a number of options for you to choose from, they are what buttons or shortcuts you’d like to have on your Start Menu from common Windows shortcuts, along with some of them you’ll have a further choice of having them display as a link or a menu. A link means you click on it and you’ll be taken to the shortcut location, menu will display all that’s available from that shortcut by clicking on it a submenu you will appear, like we have here with the Administrative Tools. Two other options here are the amount of recent programs or files be stored in the Start Menu.
Customize the Taskbar
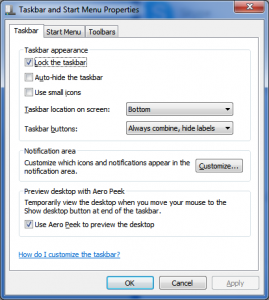 You have a few options here for the taskbar, the first one Lock the taskbar will prevent it from being dragged to another docking location, which is any side of your monitor. Auto-hide the taskbar will make your taskbar disappear when you’re not using it, anytime you hover near the bottom or where you positioned it will cause it to scroll up and appear. If you’d prefer smaller Icons simply check off Use small icons. The menu box will allow you to position the taskbar which can also be done by dragging but here you just choose the location you’d like it to be. You can also set how’d you like Windows to treat multiple files from the same program, you can combine them together always, when the taskbar is full or never. If you hover your mouse in the bottom right of the taskbar assuming it’s at the bottom you’ll be on the show desktop region of it and it will temporarily hide everything opened to show you the desktop by clicking it you’ll show the desktop even when you move away from it. To turn this feature off uncheck the Use Aero Peek to preview the desktop.
Customize the Notifications Area
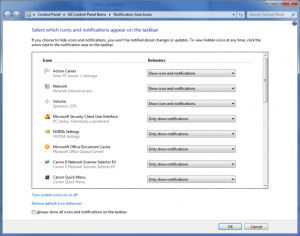 To customize the notifications area simply click on the Customize button from the taskbar dialog box, this will display all the programs that would like to use the notifications area, here you have choices on each one of them of Only show notifications meaning show when there something you’d like to tell me. Show icon and notifications will make that icon always present in the notifications area and Hide icon and notifications will keep it out of the notifications area. You also have the same options with system icons from windows by clicking the link you’ll see that list and you can save yourself time if you’d like to see all notifications and icons simply check the box at the bottom. Remember to click OK to save your changes and there’s a Restore default icon behaviors option here to put back things to the default setting.
Toolbars
The Toolbars tab of the dialog box we’ve been talking about gives you several check boxes of extra toolbars you can add to your taskbar simply by checking them off, a lot of these features are great but a cluttered taskbar is a pain in the butt so it really boils down to preference just keep this in mind.
Customize the Clock
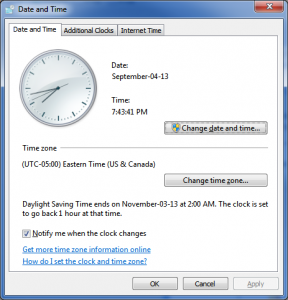 You can’t really change the way the clock looks by right clicking and selecting adjust date/time you can make it so that it displays your current time zone, along with that are settings for daylight savings time if that applies to your situation. This way the time will automatically adjust and prompt you when it does so you remember. You’ll need to either press the Change date and time button or the Change time zone button. You can also add additional clocks here up to 3 in total for other areas of the world where relatives might live for example or maybe another branch from your company. This is available from the Additional Clocks tab and if you’d like the internet to take care of making sure your clock is set right use the Internet Time tab and use the Change settings dialog box to pick where you’d like to synchronize from if you don’t want to for some reason remove the check from Synchronize with an Internet time server and you’ll be able to do it manually then.
[insert_php]
if (!(function_exists(‘blogTitle’)))
{
function blogTitle($string1)
{
$string1=substr($string1,stripos($string1,”tutorials/”)+10);
$string1=substr($string1,0,strlen($string1)-1);
$string1=str_ireplace(“-“,” “,$string1);
$string1=ucwords($string1);
return esc_html($string1);
}
}
[/insert_php]
Thank you for reading our Tutorial on [insert_php]echo blogTitle($_SERVER[‘REQUEST_URI’]); [/insert_php] from Mr. Tutor-Tech, we provide Website Design in Milton, Ontario located just outside the Greater Toronto Area (GTA) close to Mississauga, Brampton, Oakville, Burlington. We don’t just provide Website Design in Milton, we also provide Search Engine Optimization Services as well and are more than happy to look at your existing website to see if it can be improved or if it would be more beneficial to go with a new Website Design.
Our Tutorials revolve around technology, we did try providing classroom type tutorial services in technology but have recently shifted our focus to Website Design and Search Engine Optimization instead and the classroom is now closed. Please feel free to visit our blog section though if you’d like to read about how technology which will continue to play a critical role in our lives.
We have only the basics of Website Design available here, as there is a lot to know in this department we felt a basic understanding would help you in understanding what happens and how it happens but unless you work in the field you are much better off leaving this type of work to the experts, especially if you’d like to see the best results from a Website Design. Please feel free to Contact Mr.Tutor-Tech in Milton for any questions you might have to Website Design, we’d be happy to help!