
Action Center. 4
Administrative Tools. 5
AutoPlay. 5
Backup and Restore. 5
Color Management. 5
Credential Manager. 6
Date and Time. 6
Default Programs. 6
Desktop Gadgets. 6
Device Manager. 7
Devices and Printers. 7
Display. 7
Ease of Access Center. 7
Folder Options. 8
Fonts. 8
Getting Started. 8
HomeGroup. 9
Indexing Options. 9
Internet Options. 9
Keyboard. 10
Location and Other Sensors. 10
Mouse. 10
Networking and Sharing Center. 10
Notification Area Icons. 11
Parental Controls. 11
Performance Information and Tools. 11
Personalization. 11
Phone and Modem.. 11
Power Options. 12
Programs and Features. 12
Recovery. 12
Region and Language. 13
RemoteApp and Desktop Connections. 13
Sound. 13
Speech Recognition. 13
Sync Center. 14
System.. 14
Taskbar and Start Menu. 14
Troubleshooting. 15
User Accounts. 15
Windows Anytime Upgrade. 15
Windows CardSpace. 15
Windows Defender. 15
Windows Firewall 15
Windows Update. 16
The Control Panel
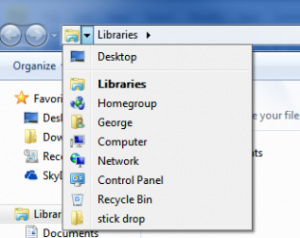
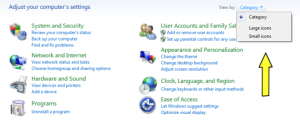 The Control Panel is pretty much what it sounds like a window where you have numerous options to control Windows itself. If you’d like to change something about the way Windows 7 looks or behaves then chances are this is the spot you’d like to come to first. Two ways you can easily get to the Control Panel is by clicking the start button then Control Panel button or through windows explorer you can click on the first arrow of the address all the way to the left and get the options from there. Once you’ve clicked on of these options then you’ll probably be presented with this screen by default. If you’re like me and for the sake of this tutorial we’ll be using the old windows format where all
  the options are displayed, so by clicking on the drop menu we’ll selected either Large or Small Icons both are identical just the size of the icons is the difference. From there you’ll end up with a complete list of options instead of categories, personally I find it much easier to find stuff this way.
Action Center
![]()
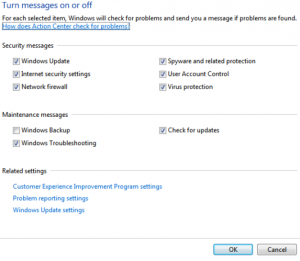 The Action Center will notify you of any recommendations Windows has for your system. Typically these recommendations should be followed but on occasion you might have no choice but to leave a recommendation alone, these are highly unlikely circumstances but it can happen. You can also access the action center through the notifications area where it will show up if there’s something you should take a look at. The Action Center will look different depending on the problems your particular system encounters. Using the options available in the top left of the panel you can us Change Action Center Settings to change the different things the Action Center will check. By using the Change User Account Control settings you can change the security level of your Windows system to avoid constant pop-ups asking you if you wanted to install something, the options available but not recommended this could save you from a hacker hacking your system. A good setting here is ¾ up. With View archived messages you can see past messages from the Action Center. View performance information will rate your computer based on its parts, the rating will be broken down per part and a total will be given, ratings are given from 1 to 7.9 with 7.9 being the best. Currently I have a fairly decent system and I core 5.9 total so don’t be to alarmed if you’re not reaching 7.9 for this rating you’d need to be a heavy video/graphics editor or possibly into some crazy games.
Administrative Tools
Administrative Tools offers some more tools for diagnosing, troubleshooting and fixing Windows components. It also has several items where you can gather information on your system or change settings as well, unfortunately this will be as much as we’ll say at this time as another tutorial will cover some of the tools available here in more detail.
AutoPlay
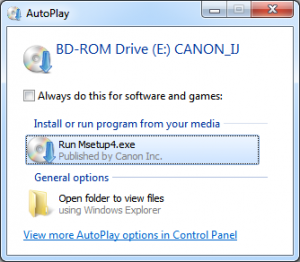 AutoPlay has been around for a while now I think I remember it being introduced with Windows 98, back then it simply worked with software and audio CD’s but with technology booming the way it has it’s been modified with time. What it does is present you with a dialog box of options to choose from when you insert certain type of media like a blank CD, a music CD or software, it’s also expanded with devices such as the IPhone and other similar devices. In this window you can control the way it works under certain circumstances like when you insert a blank CD, you can have it automatically do stuff, ask you what to do or do nothing at all.
Backup and Restore
If you use a computer than chances are you have files that you’d like to keep safe should anything happen, it’s even a good idea to back up your system as well into what’s called a system image, that way if anything were to happen like a virus for example you could quickly restore that backup having all your software already installed instead of having to go through the installation process from scratch. Systems used to come with a Windows installation disc in the past most now come with it pre-installed and no disc. This means if you’re not prompted by some third party software during your first use to backup a system image that you should do one yourself, otherwise you could have to buy a Windows installation disc. All versions of Windows 7 have the option of backing up to a disc if a CD/DVD/Blu-ray writer is present that is, with professional and ultimate you’ll also be able to backup over the network onto a networked device like another computer. Another option here is to create a system repair disc which will be useful if you can’t boot your system up at all, giving you the opportunity to restore from your backup.
Color Management
Output devices such as monitors and colour printers can be set to certain factory standards, if you’re a graphic artist or into printing then you might need to specify certain setting for that to happen. Typical users are fine with the settings but when transporting your pictures from one place to another especially for development you’ll want it to look exactly the same and that’s what these settings will help do. For the regular user there is the capability of using the wizard to calibrate your monitors from here, by clicking on the Advanced tab and then the Calibrate display button, from there simply read the instructions, basically you’ll be selecting the sharpest image from the choices presented. You can also do this for each monitor you have connected should you have multiple.
Credential Manager
Credential Manager allows you to save user name’s and passwords for computers and websites inside of what’s called a vault which you can backup and restore, keeping your information stored in a safe location. This is not the same as the browsers saving credentials when logging into sites but can be used to do the same thing, this way others using your computer will not be able to take advantage of it by the browser saving it.
Date and Time
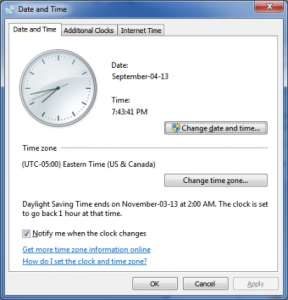 Date and time can also be accessed from the clock on the taskbar and brings up a dialog box where you can adjust your systems clock should you be in a different time zone. If you want to make the computer automatically adjust to daylight savings time, synchronize the time through the internet so it’s exact and even choose multiple clocks to display other office, then this is the place to come.
Default Programs
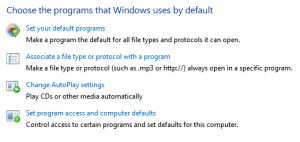 Here you can choose to specify the default programs that are used when open certain file types. For example you could have ITunes and Windows Media Player installed on your computer, each of which will probably ask if you’d like to make it the default program for opening mp3’s during installation. If you missed this step you can easily change it here, you can do it one of two ways by choosing Set your default programs or by Associate a file type or protocol with a program. The difference here is the first one will display programs you can pick from and then specify its file types from what Windows knows they can handle or you can use the second option to find the file extension and then specify the program. These selections apply to the user and not the machine to specify a default program for all users you can specify the default for the machine by using the Set program access and computer defaults option.
Desktop Gadgets
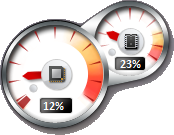 With Vista came Gadgets which are nifty little tools that can do all kinds of different things like displaying your processor and ram usage, the local weather or sticky notes you can place on your desktop for reminders and much more. From the dialog box you’ll be presented with several ones to choose from but in the bottom right you can go online to find others and there are many to choose from.
Device Manager
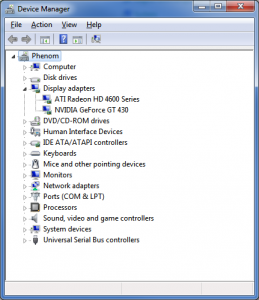 Device Manager gives you a dialog box where you’ll be presented with all the devices connected to your machine. They’re grouped into categories, by clicking on it you’ll expand the group and get a list of the devices that fall under it. If you are experiencing problems with a device you’ll notice it might have a yellow circle with an exclamation point in it. By clicking on the device you’ll notice a description of the problem displayed in its dialog box, which should typically say “This device is working properly”. If a device show’s up with a question mark icon then it means that windows doesn’t know what the device is. With either situation, typically your step will be to try installing a driver which is software that tells Windows how to communicate with it. If you’re lucky and are connected to the internet then hopefully you’ll be able to select search the internet for the best driver and it gets detected. Otherwise you might have to do some searching of your own for the appropriate driver unless a CD was provided with the product in which case you can use that.
Devices and Printers
Through this window you’ll be presented with some of the devices connected to your computer like monitors, printers, keyboards and mice. These all will come with their own settings that you can change to your liking. Like which button’s do what with the mouse or something like shortcut keys on a keyboard and what functions they will open.
Display
Display was covered thoroughly in our previous tutorial and will just be mentioned here, this is where you come to personalize your computer or change your settings for your resolution which is how detailed your images will be displayed. You can also set your font and icon sizes here should you want them displayed larger.
Ease of Access Center
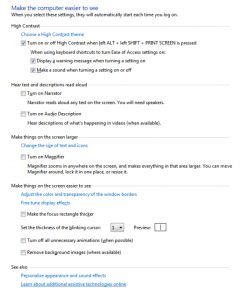 If you have some type of disability even if it’s a minor one you may want to take a look at the options here they can make Windows easier to see by changing the size of things, providing tools like a magnifying glass and other helpful tools like text to speech which will read what’s on your screen and even read out your keystrokes while you type. It also allows you enable touch screen options if you have one that is, most of the options under these menus are duplicated from one to another so it actually looks more complicated than it really is.
Folder Options
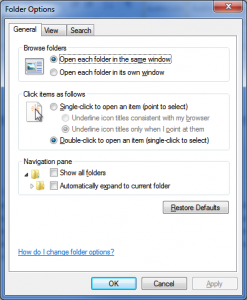 Folder Options controls the way Windows Explorer functions, settings like click once on an item to activate instead of double clicking are here along with displaying hidden folders, displaying extensions for known programs or opening folders in a new window instead of the same window and much more are located here. These options can also be accessed from Windows Explorer by pressing Alt+T(for tools) and then Folder options. There are options here as well for when you perform searches, you can specify if you’d prefer to use an index or search everything each time as well as other options like search through zip/cab files.
Fonts
 Fonts refer to the way the text or symbols are displayed as you see in this sentence where I’ve used a few different ones to make my point. It provides you with a list of fonts or their groups by clicking on them you’ll either open up the group or the font itself, when you’ve gone in deep enough into a group you’ll eventually get the font screen shown here displaying all the main characters of a font and a summary information of it in the top left. From the main panel you can also adjust the clearness of your font using the Adjust ClearType text option or make your text display larger by using Change font size. With Font settings you can hide fonts for languages you’re not using and create a keyboard shortcut for installing fonts. If you’d like to delete or hide fonts the options are also in this location, installing fonts is easy as well. You have one of two ways of going about it, by opening up a font file you’ll be presented with the option of installing it as you see in the picture or you can just copy the font folder and drop in the font’s directory. You can also create your own fonts, there’s many different ways of going about doing this but a website at http://www.myscriptfont.com/ could simplify this for you.
Getting Started

Older Windows systems used to give you this window when first installed which kept popping up during boot up unless you checked off the option for it to stop. What it is, is basically a good start for setting options and learning about Windows. Most of these are basically just shortcuts to spots in the control panel but a few options here are help options for you to get help with starting to use Windows.
HomeGroup
 When you connect to a network Windows will want to know what type of network it is? This might happen a lot especially if you’re using a wireless device and hotspots. You’ll be presented with options like Home Network, Work Network and Public Network. The Home and Work Networks are to be used only in these types of networks and assumes that computers on these networks are trust worthy and will provide you quick sharing capabilities among them. The HomeGroup is where you come to tell Windows what you’d like to share with these computers, not only can you specify what folders you’d like to share but you can also password protect them here as well. This way anyone trying to connect to your computer will need to know the password in order to see your files. With windows you can share any folder you’d like too but this could lead into security issues so it’s best to only allow shares to your personal folders if you’re going to allow it, these are pictures, documents, music, printers and video that is mostly located under the libraries folder.
Indexing Options
Indexing comes into play when searching for stuff on your computer through Windows Explorer. It works like a books index by picking up on keywords and building a list of where they are found, this way when you search for something it will try to avoid scanning each document for that piece of information and instead jump straight to the index where the answer could already be, if not then it’ll try searching the document. This could be useful when searching for thing but comes with a price as the computer needs to store extra information somewhere and also needs to compile or re-compile that information every so often. If you’d like to use it or not the option is yours and this is where you make your decision along with what info you’d like indexed, it could be a directory or a complete drive it’s your decision based on your needs. While performing searches you might be asked if you’d like to index the particular search path to speed things up in the future, you can right click on this yellow and make your decision that way as well or you can use the dialog box given you to from following the Control Panel route.
Internet Options
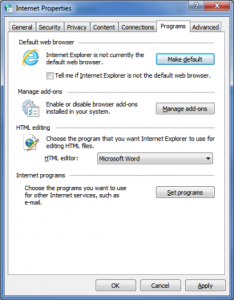 The Internet Options link will present you with a dialog box, this option in my eyes is worded wrong as it pertains to the Internet Explorer browser and not just the Internet. Here you have control over what your home page is, how you’d like tabs to behave, security/privacy options, what connections to use, manage add-ons and much more. I would like to point out that Internet Explorer is tied in with the Operating System (Windows) by using this browser you have additional exposure to viruses and malware, I highly recommend using another browser when surfing the web and based off of experience along with statistics the best browser for your computer is Google Chrome, faster and securer then the rest.
Keyboard
This option will vary depending on the keyboard you have installed. By default there’s three options you can control. Two of them are for when you hold a key down and how fast they will repeat that stroke and the last option is how fast your cursor will blink. If you have a keyboard with shortcut keys on it you’ll probably be able to specify what they do, by default they’ll probably be setup to open certain programs which you might be able to change depending on the manufacturer of the keyboard and the settings which they give you.
Location and Other Sensors
Depending on your computer, you might have sensors on it that will tell Windows or the internet of your location, this technology is typically present in mobile devices. This is how certain web-sites know exactly where you are when you come to them, a perfect example would be the weather network. The main page will typically present your current locations weather and gives you the ability of setting other locations which will always remain, this way you can add your favourite places without having to search each time.
Mouse
Depending on the mouse you have installed you might have more options but by default coming here you can choose the type of pointer your mouse will be graphically represented by. You’ll also have other options here like how fast the mouse wheel will scroll, if there should be a trail as you drag cursor around, the speed at which you can drag, snap to default buttons on new dialog boxes when the pop up, hide the pointer while typing or if you have multiple monitors like me and loose site of the pointer, you can have a circle flash around it when you press the CTRL button.
Networking and Sharing Center
When connecting to a network either local or internet you’ll need a network card, this is where you control its settings. Typically when connecting to most modem’s these days you won’t have to do anything as the settings will be pushed out from your ISP (internet service provider). This is done through what’s called DHCP (dynamic host configuration protocol) which could be used by your network as well. Chances are while working for a company that an Administrator will take care of these settings for you but should you find yourself needing to enter a certain IP number, with subnet mask and gateways then you’ll need to come here and click on Change adapter settings, followed by a right click and properties. Then you’ll need to select Internet Protocol Version 4 and enter the proper information in its properties, this will be discussed in more detail under our networking tutorial. This window will also display your current connection information along with the type of network you specified, which as discussed earlier under the HomeGroup you can control your share settings for. You can also come here if using wireless to specify which network to connect too.
Notification Area Icons
The Notification Area Icons is where you come to display which Icons can show up your notification area and if so will they always be there or only when there’s something the need to alert you about, this was discussed in one of our other tutorials and will just be mentioned here, pretty straight forward really.
Parental Controls
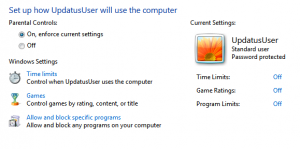 Windows offers some parental controls without third party software, this can only be applied to user accounts that are not setup as Administrators otherwise they’ll be able to change these settings. Here you can control things like what times a particular user can use the computer from. You can also specify here what programs they are allowed to use by manually selecting the allowed and disallowed programs or based on a certain rating that’s typically associated with games and not software.
Performance Information and Tools
The beauty of Windows is there is no shortage of shortcuts, no pun intended. This option was actually discussed in the beginning of this tutorial under the Action Center option.
Personalization
Personalization mentioned before in this tutorial was covered in a previous tutorial but the option is available in a number of places including the Control Panel and just as a reminder this is where you come to change the way your Windows looks and feels, through sounds and graphics that are used for key components like the window frame, close buttons etc.
Phone and Modem
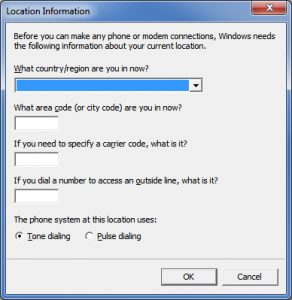 If you’ve been around computers a long enough time you might remember the days when using a phone line was the only way to connect to it, this meant using a modem and hearing some strange sounds while establishing a connection. Although most computers now a days are connected using high speed broadband modems that have nothing to do with the traditional modem, the option and even the need to use a modem still does exist. Some areas might not supply hot spots or wireless internet for you to use, so if you find yourself in Alaska, needing to call in to the office and synch your files for example then before you do this you should come here and specify where you are and how the modem should connect, is it using Tone or Pulse dialing for example but also do you need to dial a certain number to reach an outside line and is there a 1 + area code required when you do etc. On a side note with the right type of modem and software you can also use your computer as a fax machine, which is also a great way on saving paper as you don’t have to print everything to send nor do you have print everything that comes in the options yours.
Power Options
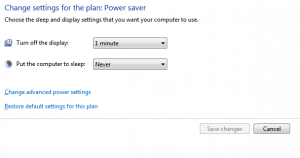 This option is mainly useful when using a mobile device as there are two different settings that will apply to it one when there’s power hooked up to the unit and one when it’s running off the battery. You might also have the option here for what happens when you close the lid on your laptop, if you’re using your laptop to hook up to a big screen or TV then you might like to close the lid without putting the computer to sleep so that you’re not wasting your displays lifespan while watching something on the TV. The basic use of this option is to put your computer and monitor to sleep after a certain amount of idle time. This used with screensaver options can lock your computer if it’s not used for a certain amount of time, hopefully saving you from someone accessing your computer should you just get up and leave kind of thing.
Programs and Features
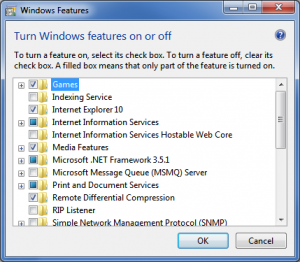 After installing a program you might find extra programs were installed and popping up or maybe you don’t like the program anymore and don’t want it anymore. For whatever reason if you’d like to remove an installed program this is where you come simply select it from the list and click on uninstall. Depending on the program the option to change some of the settings might be present here as well, if you find you need to remove or add add-ons to an installed program then you might have a chance to do it here as well, saving you from removing and installing everything all over again. With Windows comes several programs that can be installed or removed using the Turn Windows features on or off, a perfect example would be the Games that come with Windows like solitaire. It’s located here along with several more advanced programs like DHCP, IIS and more.
Recovery
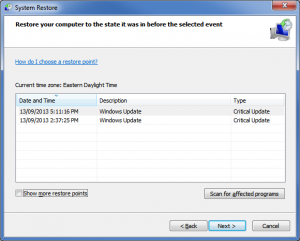 If you’re experiencing trouble with Windows this area could help you out, depending on the problem. Some programs that you are running might appear under the Troubleshoot a problem option where Windows will try to run some wizards to try to diagnose and repair issues found. If you’ve noticed these problems started after installing software, getting an update or something like that then there’s a chance you can fix this by using System Restore. Windows automatically creates restore points when installing/updating your Operating System. You can jump back to this point in time using the Open System Restore button, which will present you with a dialog box where you can choose from saved points, by checking off the Show more restore points you’ll be able to see all of them. You can also manually specify to create a restore point should you feel the need to do so.
Region and Language
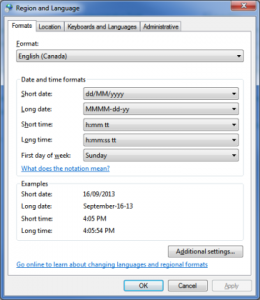 Region and Language is where you come to tell Windows what language you are using and where you are located, this will affect other settings like the clock for example or the default dictionary inside of Word. You can also come here to specify how your dates and times are to look when being displayed in either short or long format. If you have different language keyboards or use multiple ones and want to switch back and forth between them then you’ll need to specify the keyboards here as well, afterwards a shortcut on your taskbar will be displayed if you have more than one option, this way you can easily switch between them.
RemoteApp and Desktop Connections
Some places might offer you the opportunity to work from home. Without having to pay for extra software for you to install there you could possibly use a remote connection to do so. An Administrator would be required to set this up for you but if the option is available to you then you come here to specify the location of the remote computer and then you can use it as if you were right there.
Sound
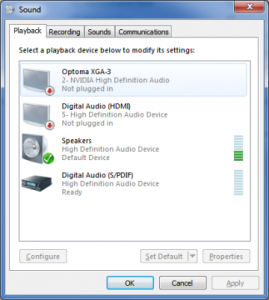 Sound is exactly what it sounds like, pun intended this time. This is where you come to control the different playback and recording devices connected to your computer, which you can also specify as being a default if you’d like. Other options here are what sounds will play during certain Windows events like starting up or logging on. If you use your computer for communication you can also tell what you’d like Windows to do with other sounds while you’re doing it, by default reducing sound by 80{463c70c279fb908728b910a090d44fbe4ae7aabcd875de9c1a518a8c8e2be8bd} might be selected.
Speech Recognition
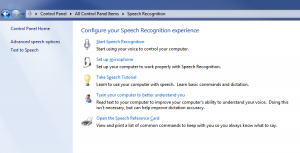 If you have a microphone you can have Windows work with your voice, there are several things you can do under this option of the control panel. This is where you can come to turn on speech recognition but before you do that you should use the Set up microphone and Train your computer to better understand you options. If you’ve never used it before you can use the Take Speech Tutorial to see what you can do which at the same time will also train your computer for your voice, the more you use it the more the computer will pick up on the way you annunciate words.
Sync Center
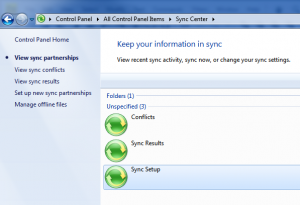 With Sync Center you can take something like office files with you on the road for example, maybe you’re just going to work on something from home or you’re a travelling sales person. From a network folder you can simply right click and select Make available offline, this will bring a copy over to your computer where Windows will monitor this way when connected back to the network and syncing the file Windows will know which files to sync, should there be a conflict because say for example someone else was working on the file as well then it should show as a conflict under the View sync conflicts option. One thing to consider here is to make sure you have enough drive space on your computer for what you’re going to sync with.
System
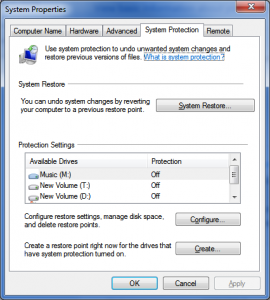 The home page for the System option of the Control Panel will display your computer name, your product ID and if it’s genuine or not along with how much RAM you have, the processor you’re running if you have a pen or touch screen connected. This area is actually quite complicated and should be avoided by novices to a degree, it will be explained in more detail through other tutorials. This area can be used to configure things like if you can connect to your computer remotely which obviously opens up security risks with it but is fairly secure especially if you know what you’re doing. It will also allow you to change a wide range of system settings through the various dialog boxes. One thing I would like to mention is that this is where you come to create a restore point should you need to do so, by clicking system protection and then the Create… button.
Taskbar and Start Menu
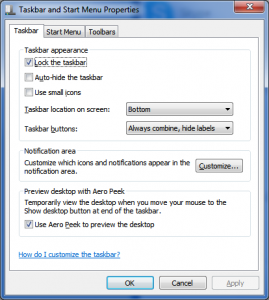 This option is described in more detail through another tutorial but here you can set the options for what your Start menu will look like along with other options for your taskbar and notifications area. Because Windows puts shortcuts in so many places you’ll find options overlapping in all sorts of places, I think it’s nice but some find it intimidating because they’re afraid to click on the options.
Troubleshooting
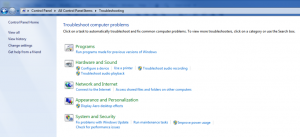 The Troubleshooting option will give you a menu of options to choose form that are grouped into categories. If you are experiencing troubles with your computer this is a good place to start. Depending on your selection here Windows will present you with dialog boxes, simple questions if there are any and then a diagnosis or an attempt on automatic repair will be made. You can also run programs here that were intended for previous versions of Windows.
User Accounts
With Windows you can create a number of different user accounts, this way other people can log into the computer without being able to see your files or you theirs, unless you have Administrative privileges which if they do means they can change anything. As an Administrator you can create new accounts here and provide them with the password protection, along with changing their user picture. This is where you also specify if they are an Administrator or a Standard User. One thing really worth mentioning here is the option Create a password reset disk which will allow you to get into the computer should you forget your password sometime down the road.
Windows Anytime Upgrade
If you find yourself needing certain Windows tools that are available on a higher version of Windows, for example you’re running a Windows Home version and need to perform a network backup, what do you do? You come give Microsoft some more of your money and visit the Windows Anytime Upgrade option, that’s what.
Windows CardSpace
CardSpace was an attempt by Microsoft to have users list credentials inside of a card, this could be used when logging on to websites to ensure that you’re actually at the site you’re supposed to be and not being lured by someone through trickery, to obtain your credentials like user name and password.
Windows Defender
Windows Defender helps to block out viruses and stuff but since Microsoft Security Essentials became available I recommend that instead. It’s available through the optional updates of Windows.
Windows Firewall
Windows Firewall requires networking knowledge which is outside the scope of this tutorial, it’s a good idea to turn this on though and have it run with the default settings. If you find yourself not able to access something over a network/internet then this could be blocking something, you can turn it off temporarily if you suspect it is to check, if it is then you’ll need to find out what setting needs to be changed for that particular protocol or application, in the meantime I would recommend turning it on and off that way it’s enabled at least some of the time.
Windows Update
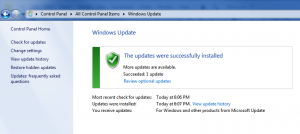 Having access to the Internet means you can update your Windows Operating System, what this means is fixing bugs/errors through extra code you download and install on your machine. Some of these bugs/errors are found because others through the internet have found them and know how to exploit them to get personal information if not all your information of the computer, it’s very important to have not only a legit version of your software but to keep up to date as well. Especially if you do any important type of work on there or have personal information that could lead to identity theft or something like that. Updates are broken up into two categories recommended and optional, I try to install updates even the optional ones except for programs I might not like that fall in the optional category, for example the bing toolbar. You may encounter side effects with updates, although they try their best it’s hard to account for every type of circumstance sometimes having a certain video card for example with a certain sound card might cause your computer to not function properly. This is where troubleshooting comes into play and should be the first place you visit from the Control Panel. If this doesn’t resolve your issue you can try uninstalling the latest updates to ensure they didn’t cause the problem, if you find one that has leave it disabled and re-install the rest until an update for that update hopefully fixes the problem. Using the left Navigation you can also use Change settings to control the way Windows looks for updates, as sometimes I find it doing while I’m on the computer and then prompting for a reboot with the possibility that if I don’t answer the question in enough time it does it automatically. Very bothersome when you’re working on a file, especially if it’s not saved or you might want to undo changes using the undo command which won’t be available when you come back up.
[insert_php]
if (!(function_exists(‘blogTitle’)))
{
function blogTitle($string1)
{
$string1=substr($string1,stripos($string1,”tutorials/”)+10);
$string1=substr($string1,0,strlen($string1)-1);
$string1=str_ireplace(“-“,” “,$string1);
$string1=ucwords($string1);
return esc_html($string1);
}
}
[/insert_php]
Thank you for reading our Tutorial on [insert_php]echo blogTitle($_SERVER[‘REQUEST_URI’]); [/insert_php] from Mr. Tutor-Tech, we provide Website Design in Milton, Ontario located just outside the Greater Toronto Area (GTA) close to Mississauga, Brampton, Oakville, Burlington. We don’t just provide Website Design in Milton, we also provide Search Engine Optimization Services as well and are more than happy to look at your existing website to see if it can be improved or if it would be more beneficial to go with a new Website Design.
Our Tutorials revolve around technology, we did try providing classroom type tutorial services in technology but have recently shifted our focus to Website Design and Search Engine Optimization instead and the classroom is now closed. Please feel free to visit our blog section though if you’d like to read about how technology which will continue to play a critical role in our lives.
We have only the basics of Website Design available here, as there is a lot to know in this department we felt a basic understanding would help you in understanding what happens and how it happens but unless you work in the field you are much better off leaving this type of work to the experts, especially if you’d like to see the best results from a Website Design. Please feel free to Contact Mr.Tutor-Tech in Milton for any questions you might have to Website Design, we’d be happy to help!