
Quick Access Toolbar. 3
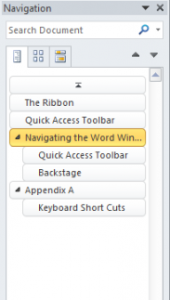
Navigating the Word Window.. 4
Quick Access Toolbar. 4
Backstage. 5
Navigation Pane. 5
The Ruler. 5
Page Count. 6
Word Count. 6
Spell Checker & Language. 6
Page View.. 6
Page Navigation. 6
Minimize Ribbon. 7
Help. 7
The Word Window.. 7
Using Word. 8
What’s a Word Processor?. 8
Save, Save As, Open, Close. 8
Info. 9
Recent. 9
Starting a New File. 9
Print. 10
Save & Send. 10
Help & Options. 10
Hello World. 10
Highlighting Text. 11
Copy, Cut and Paste. 11
Format Painter. 12
The Font Group. 12
Appendix A.. 13
Keyboard Short Cuts. 13
The Ribbon
Microsoft Word is a word processor that’s been around since 1983 and is a part of Microsoft’s Office Suite. Although it had a graphical interface when it was released its popularity took off once it became a WYSIWYG application. The acronym stands for What You See Is What You Get and it means just that, prior to this word processors would have different results between what you saw on the monitor and what was actually printed out. This was due to printers having different font sets than the ones used by the program, now a days they can do a wide assortment of things starting with text and things like graphics or imported tables from excel and more.
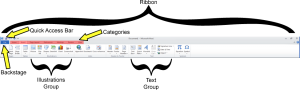
 With the introduction of Word 2007 came the ribbon which is at the top of the Word window, making it convenient for users to easily select the tool they need within a couple of clicks of the mouse or keyboard especially if you are a shortcut person like me. Just above the ribbon is the quick access toolbar and both are customizable should you want to add functions to them. Introduced in 2010 is the backstage which basically was the Microsoft Office Button in 2007. Since 2007 Microsoft also introduced two functions that help add a bunch of text to the page so that you can play with formatting before you start typing. The two functions are =rand() and =lorem() each of these need to be at the start of the line to work and within the brackets you need two additional parameters entered, which are the number of paragraphs and the number of sentences per paragraph, so they would look like =rand(5,2) or =lorem(8,5), all you need to do is hit enter after and you should see text appear like magic, just remember it needs to be done at the beginning of a line.
The ribbon is broken up into 7 categories by default, they are Home, Insert, Page Layout, References, Mailings, Review and View. It is customizable and installed add-ons may even include some of their own. There will also be other categories introduced with objects such as images that will help you manipulate that particular object. Microsoft has invested a lot of effort into the layout of the ribbon by watching and surveying users, they’ve organized it with the most commonly used tools being to the left, starting off with the Home category which includes a number of regularly used tools. The ribbon will also change in appearance depending on the current window size as you make it narrower, you’ll see the tools inside the groups collapse and show an arrow which you can click to expand the group and see the tools that belong to it. If the window becomes too thin, it will be hidden altogether. Another great option is to collapse the ribbon altogether so that you  only see the categories, which when selected will present you with the rest of the ribbon to select a tool. To do this, simply right click on the ribbon and select minimize the ribbon and to bring it back just repeat the same step as it’s a toggle option or just use the minimize ribbon button (refer to The Word Window on the next page). With the right click you’ll also see the customize options for the quick access toolbar and the ribbon which will discuss more in other courses but you might want to note the option of where the quick access toolbar displays. Unfortunately your two choices are above or below the ribbon, depending on the current location the opposite option will become available here.
Quick Access Toolbar
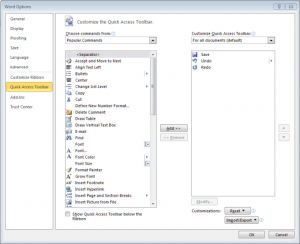 If you find yourself using certain tools often or wished some tools were located in other parts of the ribbon, then you can easily add them to the quick access bar. There are a few ways of doing this, you can click on the arrow of the quick access bar and select from the options given there or through its dialog box which can be found by right clicking on the ribbon as mentioned above or by clicking on the quick access toolbar arrow and selecting more commands at the bottom of the list. From there you simply just add/remove the commands you’d like by finding the function from the left and either clicking on add or by double clicking it. You can also filter the functions by categories to make them easier to find. If you find yourself using a tool often you can also very easily right click on it and then add it to the quick access toolbar. Try not to over crowd the toolbar or it might not be as useful, remember if it becomes too crowded you can easily remove a command by right clicking it and selecting Remove from Quick Access Toolbar or use the dialog box in the reverse manner.
Navigating the Word Window
 Before we start looking at all the fun and useful tools Word offers, let`s take a second to become familiar with navigating the Words window.
- Quick Access Toolbar
- Backstage
- Navigation Pane
- Ribbon
- Ruler
- Page Count
- Word Count
- Spell Checker
- Language
- Page View
- Page Navigation
- Vertical Scroll Bar
- Scroll Arrow
- Ruler Toggle
- Help
- Close Window
- Restore Window
- Minimize Window
- Minimize Ribbon
Quick Access Toolbar
![]() The Quick Access Toolbar by default provides you with window options. If you click on the W icon you can use it to close, move, minimize, and restore the window. The disk icon is used to save the document, if the document has already been saved it will resave the document otherwise the save as dialog box will appear asking you for a name and location. The undo arrow is beside that along with a drop down arrow which will give you the history so you can jump back further without having to repeatedly click the undo button. The redo button has a dual function, when an undo command is done it becomes a redo and if anything new is done to the document then it becomes a repeat button. The arrow beside the redo unfortunately is not a history type list, but rather the option to add other functions to the quick access toolbar that we discussed earlier.
The Quick Access Toolbar by default provides you with window options. If you click on the W icon you can use it to close, move, minimize, and restore the window. The disk icon is used to save the document, if the document has already been saved it will resave the document otherwise the save as dialog box will appear asking you for a name and location. The undo arrow is beside that along with a drop down arrow which will give you the history so you can jump back further without having to repeatedly click the undo button. The redo button has a dual function, when an undo command is done it becomes a redo and if anything new is done to the document then it becomes a repeat button. The arrow beside the redo unfortunately is not a history type list, but rather the option to add other functions to the quick access toolbar that we discussed earlier.
Backstage
 Backstage gives you the full file options like Opening, Closing, Saving and Saving As options. The info tab will give you detailed information about your file and also provides you with a number of useful tools that allow you to encrypt your file, check it for errors, save it as a previous version of word and more. The recent tab will allow you to quickly see any recent documents that were viewed. New provides more than the option of a new document, it`s loaded with templates that you can choose from in order to save you time on creating a document style. Print will give you the option of printing your document and all the options of adjusting the way your document looks before doing so. Save & Send gives a number of options that will quickly allow you to save and send your document through email, place it on a share server if your company might be using one and it also gives you the options of saving your document in other formats. The help tab will provide you with the help dialog box where you can search or browse for any information you`d like to know more about. The options button will bring up the options dialog box where you can custom tailor the way Microsoft Word works for you with a number of settings from languages, ruler measurement units and the list really does go on. When you’re finally done using Word you can always exit here or with the window close button in the top right corner.
Navigation Pane
 The Navigation Pane is a very useful tool. If it’s not visible in your window you can bring it up through the View Category and in the Show Group by checking off the Navigation Pane checkbox. If you’re familiar with the find tool, this is where it is now. It also provides you with some nifty document navigation if your documents are using styles and you have the proper titles and headings you’ll be able to quickly browse through them or if you prefer by page view and the last view applies to search results where you can see snippets from the results. The first two views will also show you results if you do a search by highlighting the ones that contain the result. Again if the documents are formated with proper titles and headings then that view becomes very handy as you can quickly see what topics your search results are coming from. By clicking on the arrow beside the search box you’ll be presented with more options for a search as well as be able to search for things like tables, graphics, formulas or even other users comments.
The Ruler
The ruler is a very useful tool not only for seeing where things are positioned on your page but for setting tabs and margins as well. To display/hide the ruler all you need to do is click on the toggle button located on the right side just above the up scroll arrow. You can easily set tab points or margins simply by dragging them to the appropriate spot or by double clicking on the ruler you’ll receive the dialog box where you can enter the information. To set a tab just click on the lower part of the ruler and you can also get it’s dialog box by double clicking on a tab marker.

Page Count
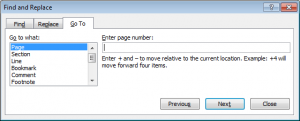 The page count displayed at the bottom left does more than just tell you what page you are on from a total amount of pages. If you click on it the find and replace dialog box appears which you can use to search for certain text along with easily replacing it as well. Another great option is the Go To section where you can choose from things like page number, sections, line numbers etc to enter information then jump to that section.
Word Count
 The word count displays the amount of words currently used in your document, by clicking on it you’ll also be presented with more detailed information such as the amount of characters with or without white space, pages, words and lines that are in your current document.
Spell Checker & Language
The spell checker status bar will show you a red X when there are errors found on your document. By clicking on it you’ll be taken to the next mistake in your document if you have one and will have a menu of choices displayed. Right beside that is the Language Status which will display the currently selected language, by clicking on it you’ll be presented with the dialog box which will allow you to select a different language for the spelling & grammar.
Page View
![]() The page view section allows you to display your document in a few different ways. Print layout being the usual way of viewing, full screen will hide as much of the word tools as possible and use your whole monitor to display the document. The web layout will make it appear more like a web page by using the width of your monitor. Outline presents you with an added section in the ribbon that allows you to collapse and expand certain parts of your document, also makes it easier to move sections. Last is draft view which is almost the same as Print Layout except you don’t see the way your work fits on the page itself. The last part of the page view is adjusting your zoom level so that you can see the whole document or zoom in to take a better look at a specific art and by zooming out seeing how multiple pages appear laid out side by side.
The page view section allows you to display your document in a few different ways. Print layout being the usual way of viewing, full screen will hide as much of the word tools as possible and use your whole monitor to display the document. The web layout will make it appear more like a web page by using the width of your monitor. Outline presents you with an added section in the ribbon that allows you to collapse and expand certain parts of your document, also makes it easier to move sections. Last is draft view which is almost the same as Print Layout except you don’t see the way your work fits on the page itself. The last part of the page view is adjusting your zoom level so that you can see the whole document or zoom in to take a better look at a specific art and by zooming out seeing how multiple pages appear laid out side by side.
Page Navigation
You can navigate through a word document in a variety of ways, most common way is to use your mouse scroll wheel but not everyone has one of those. The next easiest way is to left click and hold the mouse button while on the vertical scroll bar and simply just drag it up and down to where you’d like to go. You also have option of clicking on the up/down arrows on either side of the scroll bar to move up or down a bit at a time. Just under the down scroll arrow is the scroll by page arrows, which has a neat little function as well. Between the up and down arrows is a circle, which if you click on will present you with other options like headings, charts or images. By selecting one of these and using the arrows you’ll now jump through your documents by the selection. For example selecting images then clicking the arrows will move you through your document image by image.
Minimize Ribbon
![]() If you find the Ribbon is taking up too much real-estate on your screen you have the option of minimizing it. You can always right click it and chose the option from the menu or conveniently click on the minimize ribbon button, which will toggle it if you should want to expand it again later.
If you find the Ribbon is taking up too much real-estate on your screen you have the option of minimizing it. You can always right click it and chose the option from the menu or conveniently click on the minimize ribbon button, which will toggle it if you should want to expand it again later.
Help
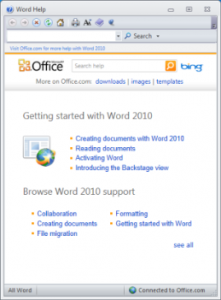 The Beatles sang “Help I need somebody” but when there’s nobody around what do you do? Luckily Microsoft should have the answer for you. You can get extensive help from a collection of files from Microsoft help either by pressing F1 or by clicking on the question mark in the top right corner to receive the help dialog box. From here you have two options you can browse by surfing through help topics using the links or you can type in your search criteria and find what you’re looking for from the search results. Everything that Word can do should be documented here, it’s also a great source for troubleshooting problems if Word is acting up on you for some reason.
The Word Window
![]() Like all windows in the Microsoft environment, Word is no different in the fact that you have your usual window controls. Here you have the options of minimizing the window, maximizing or restoring the window size to the prior setting and of course the option of closing Word altogether.
Like all windows in the Microsoft environment, Word is no different in the fact that you have your usual window controls. Here you have the options of minimizing the window, maximizing or restoring the window size to the prior setting and of course the option of closing Word altogether.
Using Word
What’s a Word Processor?
Now that we’ve mapped out the Word Window let’s talk about Word itself for a bit before we start using it. What is a word processor? It used to be a program that just simulated a typewriter on your monitor but it’s grown into something more complicated than that now. Today you can choose from a wide range of fonts and even create your own by using other programs. You can also insert images and embed other things like excel tables as well and what fun would all this be without some type of control on where it will go? Not only can you position stuff but you can also adjust the parts of the paper you’d like to use through things like margins and headers or footer settings. Want to use a different size paper to create a legal document or flyers or a greeting card, all you have to do is select from a wide range of pre-made templates or you could start from scratch and enter all the dimensions in yourself for a custom type fit. All this would be almost useless though if you couldn’t save your document.
Save, Save As, Open, Close
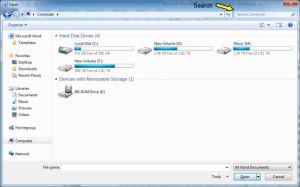
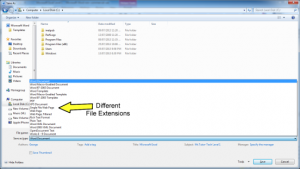 Although you can use the quick access toolbar to save files, the backstage also presents you with this option. It also presents you with the Save As option which is what comes up the first time you save a Word document. The difference between Save and Save As is that with the Save As option you specifically name the file, where the regular Save will save the file to an existing name. This is useful when you want to make changes to a file and still want to keep the original, all you have to do is simply save it under a new name. If you plan on doing this I recommend you do it right away so you don’t accidentally save the changes to the original and lose it after you close Word. When saving a document you’re also given an opportunity to save it with a different type of file format, from the drop down you can choose things like previous versions of Word (.doc), plain text (.txt.) and more including the newer Word format (.docx). Another two options from the backstage are close and open. Close is self-explanatory as it closes the current file you have open but note this does not close Word itself. Open will present you with a dialog box in which you can browse for your document or even search for it using the search option box.
Info
 With the Info tab you can get detailed information about the currently open document. On the right side you’ll see information like the size of the document, number of pages, words, Editing Time, Date Created and Modified and by who. The left side gives you some file options. The permissions button will allow you to mark the document as final if you are monitoring changes on it. More importantly though, this is where you can encrypt your file with a password, protecting it from prying eyes or even Restrict Editing so that users can read but not change the file and of course add a digital signature to it as well. The Prepare for Sharing button presents you with a couple of nice options before you send it to someone, it will quickly scan
 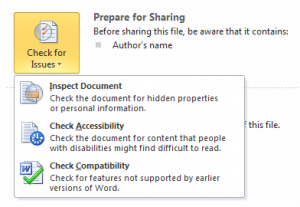 your document for anything it might deem as possibly private information with the Inspect Document tool. Check Accessibility will show you anything in your document that could present a problem for someone with a handicap. If you’d like to see what features are being used in this document that would not be supported by prior versions you can click here for a description of what could be lost. And speaking of lost, were you working on your computer and all of a sudden the power went off? Do you think the file might be lost? Well there’s a chance that word might have saved it depedning on how long you were in the document for, when starting up Word after something like this happens you should presented with a file recovery option. If you didn’t or closed it the Version button will give you a chance to recover or even delete possible recoverable files should they not be needed any longer.
Recent
 The Recent tab will present you with the most recent documents opened and places you’ve been with word. This is a convenient way of opening the last document you worked on as well as finding that recent document you saved but might have forgot where? Another great option here is that you can pin documents or places here as well meaning that they will always be there even if you open up a number of other ones. To do this, simply click on the thumb tack, which toggles between being pushed in and just pointing sideways.
Starting a New File
In order to use Microsoft Word the first thing you’ll need to do is start a new file. When you start Word that’s already done for you otherwise you can use CTRL+N. If you’d like to take advantage of Word’s templates then you can also start a new file using them from the Backstage New tab. Word comes with a wide range of templates to choose from that are organized into categories like Agendas, Budgets, Business Cards etc. By clicking on the categories you‘ll be taken to either a choice of templates that you can download or possibly sub-categories to choose from first.
The Print tab of the backstage will present you with a preview of your document along with a number of printer settings available for your specific printer. Some typical options between all printers are the number of copies, printing all pages or specific ones. The page orientation will it be presented sideways (Landscape) or normally (Portrait). You can also set your margins here from prefigured options or setting your own. The status of the printer and the chosen printer are also displayed, which you can change should you want to use another printer available to you.
Save & Send
Another convenience from the backstage is under the Save & Send tab, from here you can quickly choose from several different options. Some will just save the file as a different extension which you can do from the Save dialog as well like PDF or XPS. Here you are also presented with options of saving the document and then sending it via email right away. If you’re company is using a share point server or a web server that you’ll upload your document to then these options are present here as well.
Help & Options
Although you could easily get help at any time by pressing the F1 key a common feature among most programs by the way, you can get a bit more info here under the Help tab as well. Your product ID and if Word has been activated, contacting Microsoft for support or even checking for updates. The Options tab is available here as well as by clicking on it through the Backstage bar. You can control how you interact with Word through the options dialog box, there a number of settings there like autocorrect, spellchecker, rulers, saving options etc.
Hello World
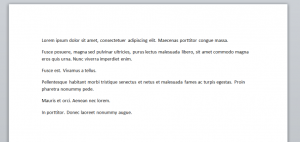 Hello World is a programmer’s reference to one of the first programs that displayed text on a monitor. What does all this mean? Well you’re ready to create a document, we’ll just make it a little lengthier then just Hello World. Before wrapping up we’ll quickly add some text and quickly explain some of the simple options you have with it. If you can’t type really quickly and need text remember that you can always use the two formulas lorem and rand at the beginning of a line, so type =lorem(6,2) and you should get some text that looks like the image above.
Highlighting Text
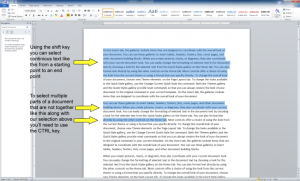 Selecting or highlighting text can be done a few different ways using the mouse, keyboard or combination of both. This highlighting is not the same as the formatting type that makes your text stand out, what you’ll see is a blue background appear around what you select. This will not show up in your document if printed and will disappear once you start typing again. What you are doing here is selecting text that you would like to make changes to, something you might want to copy or cut which will talk about shortly. The easiest way to highlight something is to left click the mouse button from a starting point, then while holding the mouse button down drag the cursor over to the finishing point. The same can be achieved by left clicking and releasing the left mouse button at a starting point, then while holding down the shift button left click at the end of the selection. By using the mouse button you can also double click on a word and this will select the whole word. By triple clicking the mouse button you’ll select the whole paragraph. You can also select a full line by clicking beside it in the left margin. If you use the keyboard a lot then the option of moving around the document with the arrow keys exists and just like the second mouse method you can hold down the shift key while moving around to select text. One last note on selecting text is you can use the CTRL key as well to select text, it can behave like the shift key but the difference is while using the CTRL key you can select text that’s not connected unlike the shift key which selects everything from the beginning to the end position.
Copy, Cut and Paste
 Sometimes you’ll find yourself wanting to move some text or even copy some text from one point and put it somewhere else possibly another document. When you cut or copy something you are placing it into memory where a copy of it will exist until it’s overwritten. The difference between the two is with copy the selected text remains there and with cut it will be removed, you can paste either one after where ever you want by placing your cursor where you’d like it to go and then pasting it
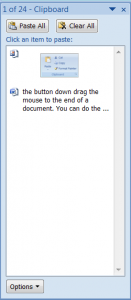 even several times. There are two memory locations in Word, there’s your typical Windows memory location which will only hold one item at a time, so as soon as you copy or cut something else it will be replaced in its memory by the new selection. This could be bad if you cut something as you’ve just lost that altogether. Luckily there’s another memory area called the Office clipboard which holds up to 24 items but it will only start doing so once it’s opened, you can do that by clicking on the arrow in the bottom left of the Clipboard group to get a dialog box. Once it’s open you can copy away up to 24 items before a new one replaces the oldest. Once you have your text selected to cut or copy you have multiple options to choose from. First there’s the shortcut key’s CTRL+C for copy and CTRL-X for cut, or you could use the mouse’s right button to bring up a menu with the options located at the top. Then there’s the cut and copy options from the Clipboard group of the Home tab. There’s also the mouse method using the left button, to simply move (cut) something after selected text simply left click and hold the button down and drag it to where you’d like it to go, to copy it repeat the same procedure just hold down the CTRL key while you do it and you’ll make a copy. The left mouse button takes care of the pasting automatically but if you used one of the other methods then pasting is just as easy, CTRL-V to paste using shortcut keys. There’s also the menu from the right mouse button, in the Clipboard group there’s also the paste option which will present you with the paste special option as well. If you have the office clipboard open then you’ll be able to select from the list on the left from one of your possible 24 choices that you copied or pasted to it by simply just left clicking on it. Another option with pasting is using its drop down menu to specify if the content you are about to paste should keep its formatting, use the one in the current document, merge the two or have none at all.
Format Painter
The Format Painter tool is a very useful tool, it doesn’t copy the text but rather the way the text was formatted for example the title above the beginning of this paragraph. To select the text you’d like to copy to the Format Painter put your cursor on it and click on the Format Painter button to use it to apply once to text or by double clicking the Format Painter button you can now apply it anywhere quickly, simply by clicking, to turn it off all you have to do is click on the Format Painter button again.
The Font Group
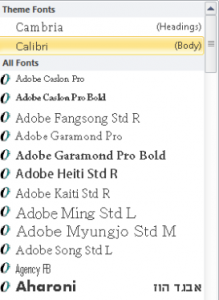 Before wrapping up this module we’ll talk about the font group and the options we have within it. In the top left of the group are two drop down boxes that allow you to select what font you would like from a long list of options. Remember you can always get more fonts as well if you don’t see anything here you like. A neat little trick to see what you’re text will actually look like is to highlight text in your document and then scroll through the choices, as you do this the text you highlighted will change. The size drop down arrow right beside the font will allow you to set the size of the font in points. You could also adjust the size of the font by one point at a time by using the bigger or smaller A’s just left of that. The Aa option will allow you to convert text to lowercase, UPPERCASE, Sentence case, Capitalize Each Word and last but not least toggle (which will reverse your current selection). The eraser next to that is not to erase words but instead clears any
 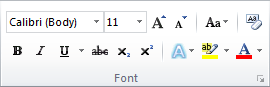 formating like bold, italics, underline etc. These three are located just under the font type. Next to them is the strikethrough, subscript and superscript buttons. The following three boxes are text effects, highlighter and font colour, any of these buttons that have arrows will also present you with more options like different effects or colour options. By clicking on the button alone you will use either the last used option or Words default. A neat little shortcut for these options presents itself when using a mouse, right after you make the selection if you continue to hover over the selected text you might see an outline of a box appear, if you move toward this box it’ll become clear and present you with the Font group options right there where your mouse pointer is.
Now that you’ve created a document and made changes, copied or moved some stuff around the only thing you’ll need to do is save it so you can revisit it at some other time.
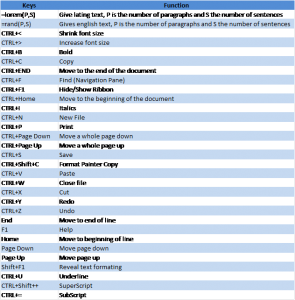
Appendix A
Keyboard Short Cuts
[insert_php]
if (!(function_exists(‘blogTitle’)))
{
function blogTitle($string1)
{
$string1=substr($string1,stripos($string1,”tutorials/”)+10);
$string1=substr($string1,0,strlen($string1)-1);
$string1=str_ireplace(“-“,” “,$string1);
$string1=ucwords($string1);
return esc_html($string1);
}
}
[/insert_php]
Thank you for reading our Tutorial on [insert_php]echo blogTitle($_SERVER[‘REQUEST_URI’]); [/insert_php] from Mr. Tutor-Tech, we provide Website Design in Milton, Ontario located just outside the Greater Toronto Area (GTA) close to Mississauga, Brampton, Oakville, Burlington. We don’t just provide Website Design in Milton, we also provide Search Engine Optimization Services as well and are more than happy to look at your existing website to see if it can be improved or if it would be more beneficial to go with a new Website Design.
Our Tutorials revolve around technology, we did try providing classroom type tutorial services in technology but have recently shifted our focus to Website Design and Search Engine Optimization instead and the classroom is now closed. Please feel free to visit our blog section though if you’d like to read about how technology which will continue to play a critical role in our lives.
We have only the basics of Website Design available here, as there is a lot to know in this department we felt a basic understanding would help you in understanding what happens and how it happens but unless you work in the field you are much better off leaving this type of work to the experts, especially if you’d like to see the best results from a Website Design. Please feel free to Contact Mr.Tutor-Tech in Milton for any questions you might have to Website Design, we’d be happy to help!