
Paragraph Group. 3
Tabs. 5
Styles Group. 5
Editing Group. 6
Page Layout Tab. 6
Themes Group. 6
Page Setup Group. 7
Page Background Group. 8
Paragraph Group. 8
Arrange Group. 8
Edit Wrap Points. 9
Images. 10
Inserting Images. 10
Picture Tools Format Tab. 10
Adjust Group. 10
Picture Styles Group. 11
Arrange Group. 11
Size. 11
Insert Tab. 12
Pages Group. 12
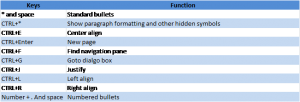
Appendix A.. 13
Keyboard Short Cuts. 13
Home Tab
Paragraph Group
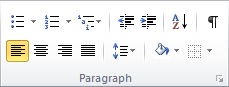 In the Paragraph group you can control several aspects of the way your text appears. Starting from the top left we have 3 different choices of bullets to choose from. The first one is unordered or just your regular bullets that stand out, after that we have two ordered ones with the first one being a straight numbered list and the multi-level after that. With the first one your list will increase in number as you press enter for your next line item, by pressing tab here you actually change it over to the multi-level list as Word automatically detects your intentions. This means a sub-number of the item will start with letters beginning with a). You can also start bullets by placing an * or a number with a period and the pressing space, Words AutoDetect will take care of it for you.
Next to the bullets we have indents which are being used here by pressing it twice I pushed this paragraph in. If I wanted to pull this paragraph back to the normal position I would simply push the one with arrow going to the left twice.
 The Paragraph function will display behind the scene characters that are typically invisible like character returns or spaces. This can be useful sometimes when selecting text for copying as you can get everything you want including the character return.
The next four boxes deal with text alignment, the normal left algin is what you’ve been seeing up until this point now the text is being aligned to the right, this means that the straight line you see along the side will be on the right, typically you wouldn’t use the right alignment with something like this but maybe a title or something else.
We can also align our text so that it’s centered inside of the page perfectly no matter how many words we use it will align them from the middle
line by line.
The last alginment to cover is the justify option. This ensures that both sides of the line are creating a straight line by spacing the text appropriately to do so, in order to demonstrate this here I’ve also reduced my right margin to narrow this text down to a column like you would see in a newspaper and also reduced the text size to keep it within this page. I’ve also reduced the space between each line using the line spacing button just after all the alignment tools.
Using the line spacing button you can tighten or even make your lines more spaced apart by changing the value 1.0 used to be the norm but it was bumped to 1.15 now but I’m using 1.5 here to demonstrate. Along with returning this column to left justified.
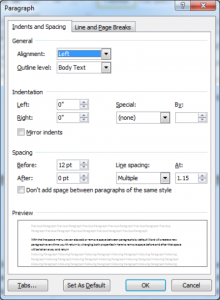 With the line space menu we can also add or remove space between paragraphs by default Word will create a new paragraph everytime you hit return by changing both properties in here to remove space before and after that space will be taken away and return will just give you a new line. This is a toggle option so if it says add space this means you’ve already selected remove space and vice versa. By choosing line spacing options you’ll be taken into the Paragraph dialog box which can also be done through the arrow at the bottom right of the group. This will give you all the settings available and let you manually enter numbers for indentation, spacing, alignment along with a few more other options not available on the ribbon like how much spacing there is before and after paragraphs, specify line spacing options that are not available in the list.
By clicking on the bucket you can change the colour of the background your text is occuping, the default colour is white but there are many to chose from by pressing the arrow a menu of popular colours will appear but by clicking on more colours you’ll be able to enter or choose a more specific shade. Right beside that is your border options which can give you a box around your text like I’m using here. Or you can specify a specific side if you’d like or no borders if you’d like to remove them. At the bottom of the list is the Border and Shading option, this will give you more options like hashed or dotted borders and even how thick you’d like it to be. Another option here is a horizontal line like the one you see just below.
Tabs
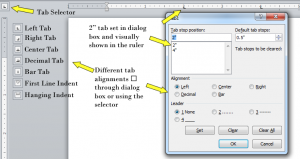 Tabs allow you to indent your text, by default Word has tabs set every .5”. You can specify either a new default if you’d like or set certain tabs exactly where you want them so that you can easily jump to the point in the document you’d like. You can access the tabs dialog box in a couple of ways one way is from the bottom of the paragraph dialog box pictured above, another way is double clicking on an existing tab in the ruler if there is one. But you also don’t really have to access it because everything you need is right in front of you. By clicking on the tab selector you can cycle through the different type of alignments you have for the tabs themselves. The different selections available are listed in the picture, you have left tab, right tab, center tab, decimal tab and bar tab, the last two are indents for the first and last line. The first three left, right and center are they way your text will be alligned. Decimal will make sure your decimal numbers line up and the bar tab will place a vertical bar at every tab point you make. The last two are self-explanatory as they’ll leave an indent you specify either at the beginning or end of a pargarph depending on which you chose.
Styles Group
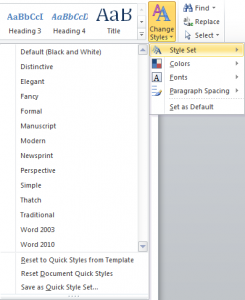 You can format your document using the regular font formatting but Word has a better feature called Styles. Using styles in your document with titles, headings etc. gives Word information about your document which you’ll notice in the Navigation pane immediately with the headings view. Here you’ll be able to quickly scan your document for major titles and quickly traverse it to find exactly what you might be looking for. They can also be used to create a table of contents on the fly and even update it while continuing to work on the document. The real beauty of adding styles to your document is that you can quickly change the way your document looks, by selecting the drop down list and by choosing a different style set from its drop down or maybe you’d like to just change the colours combinations being used or even the font combination being used. You can even create your own style sets, colour patterns or font sets as well and then save them here for next time. As usual Microsoft also gave you another place to change the paragraph spacing as well using it’s dialog box here you can increase or decrease the space to what you’d like.
Editing Group
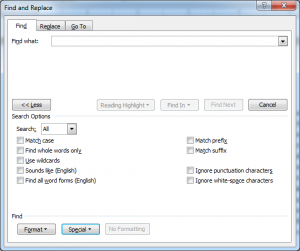 The editing group gives you options for searching your document. The find button will take you to the navigation pane which we discussed in Level 1, the advanced find will bring up the find dialog box which is a bit more familiar to most people. The advanced find, replace and go to functions are all in the same dialog but Microsoft gave you the options of directly accessing which one you want directly. As you can see from the picture you can quickly change between them by changing tabs, should you find something that you decide to change all you have to do is choose the appropriate tab. If you’re thinking this looks pretty basic for an advanced find you might have overlooked the more button. This will give you extra options like the direction you’ll search or the entire document. You’ll be able to make it case sensitive, find whole words only so tab won’t bring back tables for example. Use wildcards, sounds like, all word forms, prefix, suffix, ignore punctuation or ignore white space. You also have to more buttons at the bottom to add formatting to the replaced text or to even search for text with specific formatting. The special button will give you a list of special characters like the character return or a wild card to insert into the search.
Page Layout Tab
Themes Group
Styles which we talked about a little earlier revolve around themes. Themes basically tell your document what the default font styles will be and usually this means having one type of font for headings and another for the body but you can use one font for both if you wish. It also includes a list of colours it will use for specific items like the page colour, body font colour, heading colour etc. These will slightly change when picking different styles but typically will revolve around the theme itself. You can manually specify the font’s or colours sets (even individual colours) you’d like and if you customize a theme you also have the option of saving it for later use, which also means any office program like Excel not just Word.
The styles group we talked about earlier and the Themes share two drop down menus which are colors and fonts. From either one of the groups we can choose a colour set we’d like to use or create our own based on colours we choose. They also share the Fonts drop down which can be used to select font combinations from the list or again we can create our own combination or just use the same font for both. In either of these if you created your own set they can be saved for later use, this can also be done with the whole theme itself. If you are using anything like text effects then you can also change their fill and outline by simply selecting different effects.
Page Setup Group
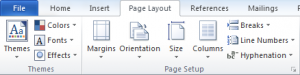 In the Page Setup group we can change several ways of how our page behaves. The first drop down box presents us with Margins which is the spacing on the right and left side of your page. Headers which are on top of your page and footers which are on the bottom are also included into this category. From the drop down menu you can choose from a few typical pre-sets or like almost anything else in Word create your own custom dimensions. Unfortunately hovering over these items will not show you what your text will look like with the changes. When going to print a document you also have options in the print preview area of changing your margins should you wish to do so.
The next button in line is the Orientation menu, from here you have one of two choices either Landscape or Portrait. These names came from artwork typically when a portrait was done the canvas is taller than it was wider and landscape art typically is wider than taller. A perfect use for landscape would be something like a calendar or a spread sheet that has several columns which you’d like to see on a single sheet of paper.
What fun would Word be without being able to specify the page size you are using, there’s your typical 8 ½ x 11 paper size which is the default or if you are in a legal profession you might need to use 8 ½ x 14. These are not your only two options though as there are choices here for tabloid or even different types of envelopes that can be used, not to mention you can specify your own size. The only thing to remember here is the printer you’ll be using needs to be able to support the size you enter or you might just have to take it somewhere where they do like a print shop.
When you find yourself near the bottom of the page and wanting to keep your next paragraph together then a page break is what you need. The typical break is the page break which has a shortcut of CTRL+Enter or you can just click on the Breaks button. There are other choices for breaks which are separated into two categories in the menu. The first one is page breaks which include a typical page break, a column break which will start the next line in the next column and a text wrapping break which will separate text around objects. The section breaks include Next Page which will start a new section on the next page, Continuous which will start a new section but keep it on the same page. The last two will start a new section but will do it either on the next Even Page or Odd Page depending on the option you choose.
As a programmer it’s very useful having line number along the side of your work, especially when errors come back reporting the error was on line so and so. Makes it so much easier to be able to just follow the numbers along on the left until you get to the line you’re looking for. You have a few choices here starting with none the default, after that is continuous which will start at the top and count to the end. Restart Each Page/Section means the numbers will start off at 1 on either every page or section breaks you may have created. There’s also the ability to suppress the current paragraph so it won’t be affected.
Hyphenation simply just lets you either manually or automatically split words with hyphens at the end of sentences for the current section.
Page Background Group

 The Page Background group starts off with watermarks, which is a nifty little tool especially if you want to play secret agent man. You can quickly with a click mark files as confidential, sample, do not copy, draft, urgent and anything you’d like really. If there’s nothing in the list you like you can visit office.com to see if there is something there or import a graphic from a file you create yourself.
With Page Color you can change the colour of your paper to any of the one’s in the list and from around 16 million more colours by clicking on more colours. Here you use the crosshairs to select a colour range with the arrow on the right bar you can select the a slightly lighter or darker shading.
Paragraph Group
 With the Paragraph group in the Page Layout tab you have a few of the options that you don’t have on the one in the Home tab, here you can select an indent for the current or selected paragraphs as well as control the line spacing between the paragraphs. You can also click on the arrow in the bottom right to get to the Paragraph dialog box as you can of the Home tab one.
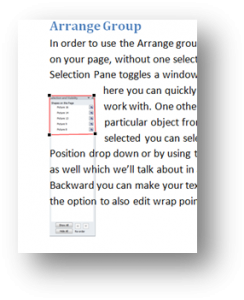
Arrange Group
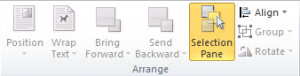
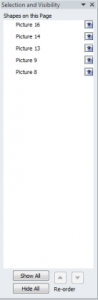 In order to use the Arrange group you need to have a graphic on your page, without one selected only the Selection Pane and Align drop down list are available. The Selection Pane toggles a window which will show you the graphics currently available on the page. From here you can quickly click and choose which graphic you’d like to work with. One other option it provides is the ability to hide that particular object from the page. Once you have a graphic selected you can select how you’d like the text to behave with it by selecting from the Position drop down or by using the Wrap Text. You can always shrink and move the graphic if you’d like as well which we’ll talk about in a minute, to anywhere you’d like. With Bring Forward and Send Backward you can make your text appear over your graphic or send it behind it. In the menu you have the option to also edit wrap points which dictate where text can and can’t go.
 The last three drop downs apply to graphics as well the Align the only one available without one selected will give you options of showing a grid on your page for alignment purposes, you can set these if you’d like to certain a certain size. You can also set the default for the alignment choices available when you do have a graphic selected and this is to Align to Page or Align to Margins. With a graphic selected you can quickly select the position you’d like to align it to. With at least three objects selected you can also distribute them evenly vertically or horizontally as well. The Group drop down will present you with options of grouping or ungrouping depending on what’s selected. If you find yourself wanting to put several pictures together and move them around as one you can group them and by selecting a grouped picture you can undo that grouping. The last final drop down from the menu allows you to rotate 90 degrees either way or to mirror the picture either way. With the more option you’ll receive the Layout dialog box where you can control the graphics angle to a better precession along with the ability to shrink or enlarge the picture and through the other tabs are able to control the positioning and behaviour that we just talked about in the paragraph before using the buttons from the Arrange group. Most of these options are also available from the right click of the mouse while an object is selected as well.
Edit Wrap Points
 There’s one tool that’s available in the Wrap Text menu that’s worth mentioning on its own and that’s the Edit Wrap Points function. When you set text wrapping for a picture Word will automatically set Wrap Points for you, depending on the option for wrapping you selected and the type of image that is, it might not always come out the way you hoped for but luckily you can change this by editing the wrap points. With an image selected and selecting Edit Wrap Points from the Wrap Text menu. You’ll then be presented with a red outline around your image, with black squares on them usually at intersecting points. These black boxes are handles by putting your mouse on them and holding down the left button you can drag them to provide yourself with more or less space. The picture to the right was taken from a couple of paragraphs above displaying the wrap points I set on it. You’ll notice that the box doesn’t run around the entire image I actually moved the bottom left and right wrap points up to make the box smaller this way I could demonstrate text running through the image but I didn’t want it running through the whole image, just the clearer area where it doesn’t look so bad.
Images
Inserting Images
 Word 2010 makes it a snap to add images to your document, you can do it a few different ways. The first way we’ll talk about is available from the Insert Tab from the Illustrations group which we’ll talk about in the next level. But for now we’ll just look at the first item the Picture. This button will bring up the Insert Picture dialog box which will ask you to locate the picture you’d like to insert. After doing this the picture will be located where your cursor is currently positioned. By default a picture will be placed in the document in line with the text and will make the line as high as the picture is. Before we talk about the other options available to fix this let’s mention the other ways you can bring a picture into the page. If you prefer to edit your pictures in another program like me you can simply copy and paste them into the document to the current cursor location. If you have them open at the same time and use multiple monitors like me or can split the two between one monitor then you can also drag and drop the image as well. Once you have an image on the screen you can select and the options we just talked about will now be available to you as well as a new tab named Format highlighted by the Picture Tools heading.
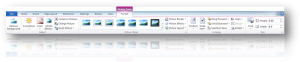
Picture Tools Format Tab
Adjust Group
The Adjust group gives you a few tools to alter the picture you’ve imported. The first button Remove Background will shade in your image and offer you a new menu in the Ribbon by using the tools now available you mark parts of the image you would like to show by removing the pink border around it. The next tool available Corrections allows you to quickly sharpen or change the brightness of a picture. Color will change the colour values in your picture to reflect the choice made, you could use like a beige colour to simulate sepia if you wanted to or use your company’s theme colours for example. Artistic Effects will allow you to change the picture with effects like blurring the picture or making it look like pencil art. The compress Picture button will shrink your picture in the page to an optimized size so that your document doesn’t consume as much drive space. You could also change the picture if you needed to as well by clicking the Change Picture button and finding the picture you’d like to replace it with. The last button will allow you to reset your picture by clicking it you’ll reset only the formatting done to it, the drop down menu will allow you to reset the size as well.
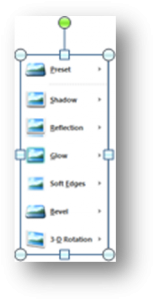
Picture Styles Group
 With the Picture Styles group you can give border effects like we did to the picture above by providing shadows and a reflection to it with a fade you can make images have a little more life in them. There are a number of pre-sets you can choose from or you can make your own by using the Picture Border drop down you can select what colour you would like to use. The Picture effects drop down will present you with a few more drop downs that are categories for pre-sets you can choose from with more flexibility available for most of them in the Format Picture dialog box. At the bottom of the each list is a direct link to that corresponding choice in the dialog box or you could simply get there by right clicking on the picture. The last option Picture Layout allows you to choose from multiple templates and automatic picture layouts that have text and art designed around them.
Arrange Group
This group should look familiar to you, it’s exactly the same that we had in the Page Layout tab that we discussed earlier in this course. For convenience it’s located in both places and don’t forget that you can also access most of the options available for pictures through the right click of the mouse. Microsoft really did a good job of making the tools right there for you when working with images.
Size
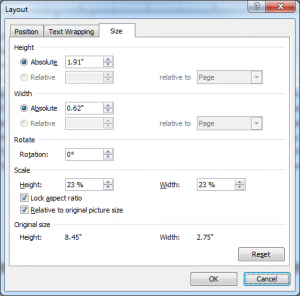
 In the Size group you can crop your picture if you’d like by pressing the crop button or manually enter in the height and width through the text boxes. A better way to do this is to use the handles on the picture instead, this way you actually see how your picture will look while you do it. There are 9 handles on the picture here, to use them you simply put your mouse over them and hold down the left mouse button. Then depending on the handle with the movements of the mouse the following adjustments will happen. The green round handle at the top will allow you to rotate the image. The round ones in the corners allow you to change both height and width for the image by moving in or away from the image it will either shrink or grow but will keep its proportions while doing so. The square handles on the other hand will only allow you to adjust the height or width depending on which one you grab.
Insert Tab
Pages Group
We’ll wrap up this module with talking about the Pages group which is the first group of the Insert tab. The first option here is to create a cover page at the beginning of your document. You can do this at any time you want, after clicking on the button you’ll have a number of options to choose from, once you’ve selected the look you want you can then go in and enter text in the appropriate spots provided by the template or using Word tools modify the look altogether. Don’t forget you could always create your own. If you wanted to insert a blank page then you could easily click on the Blank Page button or the Page Break button which pretty much do the same thing and create a new page after the one you are currently on and place the cursor at the top. Personally I prefer the method I found out about a long time ago and that’s the CTRL+Enter combination, much quicker and leaves your fingers on the keyboard.
Appendix A
Keyboard Short Cuts
[insert_php]
if (!(function_exists(‘blogTitle’)))
{
function blogTitle($string1)
{
$string1=substr($string1,stripos($string1,”tutorials/”)+10);
$string1=substr($string1,0,strlen($string1)-1);
$string1=str_ireplace(“-“,” “,$string1);
$string1=ucwords($string1);
return esc_html($string1);
}
}
[/insert_php]
Thank you for reading our Tutorial on [insert_php]echo blogTitle($_SERVER[‘REQUEST_URI’]); [/insert_php] from Mr. Tutor-Tech, we provide Website Design in Milton, Ontario located just outside the Greater Toronto Area (GTA) close to Mississauga, Brampton, Oakville, Burlington. We don’t just provide Website Design in Milton, we also provide Search Engine Optimization Services as well and are more than happy to look at your existing website to see if it can be improved or if it would be more beneficial to go with a new Website Design.
Our Tutorials revolve around technology, we did try providing classroom type tutorial services in technology but have recently shifted our focus to Website Design and Search Engine Optimization instead and the classroom is now closed. Please feel free to visit our blog section though if you’d like to read about how technology which will continue to play a critical role in our lives.
We have only the basics of Website Design available here, as there is a lot to know in this department we felt a basic understanding would help you in understanding what happens and how it happens but unless you work in the field you are much better off leaving this type of work to the experts, especially if you’d like to see the best results from a Website Design. Please feel free to Contact Mr.Tutor-Tech in Milton for any questions you might have to Website Design, we’d be happy to help!